
One of the features that QuickBooks offers is the ability to reconcile accounts. This can be a helpful tool for businesses with multiple QuickBooks accounts or for businesses that use both the desktop and online versions of QuickBooks. Reconcile in QuickBooks is the process of matching your bank statement to your QuickBooks records. This is an important step in keeping your books accurate and can help you catch any errors or fraudulent activity.
This guide will show you how to reconcile in QuickBooks desktop and online versions. The steps are slightly different, but the principle is the same. You will need to balance your account by ensuring that the total amount of money shown on your bank statement matches the total amount of money shown in QuickBooks.
Why Reconcile in QuickBooks Desktop and Online?
- Keep track of your business finances: QuickBooks can help you track your finances by reconciling your accounts regularly. This way, you can be sure that your books are accurate and up-to-date.
- Avoid penalties and fees: If you don’t reconcile your accounts, you may be subject to late fees or other penalties from your financial institution.
- Save time and money: Reconciling your accounts can save you time and money in the long run by preventing reconcile in QuickBooks discrepancies and mistakes.
- Improve cash flow: By reconciling your accounts regularly, you can improve your business’s cash flow by ensuring that all payments are made on time and that there are no outstanding balances.
- Avoid fraud and theft: Reconciling your accounts can help you avoid fraud and theft by keeping track of all transactions and ensuring that all funds are accounted for.
- Enhance decision-making: QuickBooks can help you make better business decisions by providing accurate financial information that is up-to-date.
- Simplify tax time: Reconciling your accounts can simplify tax time by providing accurate records of all income and expenses.
- Improve customer service: By reconciling your accounts, you can improve customer service by ensuring that invoices are paid on time and that customers are billed correctly.
- Meet legal requirements: In some cases, reconciling your accounts may be required by law, such as when preparing financial statements.
- Peace of mind: Reconciling your accounts can give you peace of mind by providing you with accurate financial information and ensuring that all of your business transactions are accounted for.
Read Also: What is QuickBooks Point of Sales?How to Reconcile in QuickBooks Online?
Here is how to correct reconcile in QuickBooks Online in these steps:
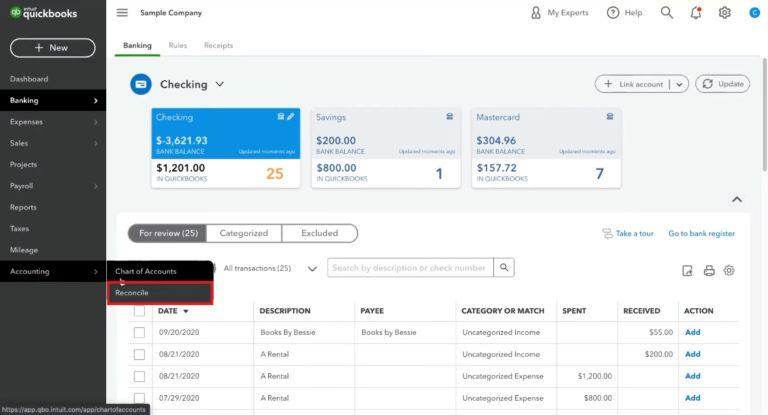
1. Open QuickBooks Online and Tap on “Bank Reconciliation”
Here, you have to tap on “Accounting.” Once done, click on “Reconcile.”
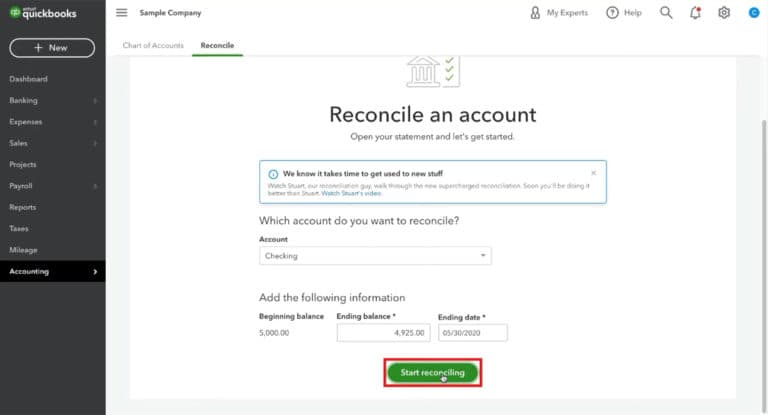
2. Choose a Bank Account to Reconcile
- Account: Choose the preferred account
- Beginning Balance: Simply confirm it.
- Mismatched Beginning Balance: If QuickBooks online bank reconciliation beginning balance doesn’t match then it can lead to various errors. So, after performing the above step, enter the transaction, put the correct values, and match the account and QuickBooks balance.
After that, QuickBooks will come with a warning and throw up a link to identify the last changed reconciled transactions. Now you will have to follow the next process:
- Ending Balance: Input the ending balance (from your Statement).
- Ending Date: Provide the ending date from your Statement.
- Service Charge: Provide the Date, expense, and amount, as mentioned in the Statement.
- Interest Earned: Now, enter the interest you get from your bank balance.
After completing the above actions, click on “Start Reconciling”.
While performing these steps, there are chances that QuickBooks will shut down or QuickBooks won’t open or hang. If you also come across such a situation, simply restart your PC.
3. Match Transactions
After performing the above steps, the QuickBooks reconciliation window shows the summary and transactions list. Here, you have to match them carefully. Let’s check out the detailed process below:
- Cleared Transactions Summary: Here, the Beginning balance – payments cleared + deposits cleared reflects the cleared balance. You will see a radial button saying total transactions. It’s your payments and deposits. You can check the difference between cleared balance and the ending balance of your Statement. Remember that this difference has to be 0 to complete reconcile in QuickBooks.
- List of Transactions: The section named “List of transactions” comes now. This section usually involves uncleared QB transactions. Here, take note that any uncleared transactions in the current month will show up again in the following month.
- Radial Buttons: You have to click this button on the right side of the transactions to reflect the transaction within the cleared activity summary.
- Problems Tracing Deposits: A bank statement has been deposited with various checks in a single translation. If each client check reflects an individual deposit in Quickbooks, it will be tough to trace the deposits. Hence, experts recommend doing it via undeposited funds only.
4. Verify that there is Zero Dissimilarity
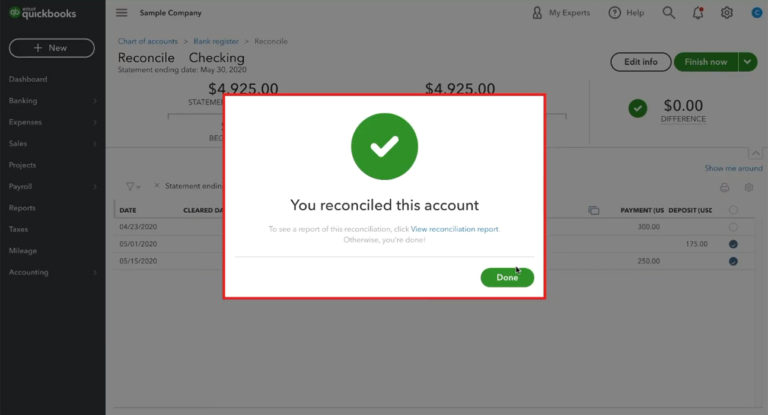
After matching the bank and QuickBooks statement transactions, the result should be a zero difference. Furthermore, it is important to complete the princess with Zero difference to keep QuickBooks bank reconciliation issues from occurring.
Once you see the difference is 0, tap on “Finish now” to finish the reconciliation.
Read More: Resolve QuickBooks Update Error 15223 | QB Payroll Error5. Review and Save Reports of QuickBooks Bank Reconciliation
After you reach this step, the next action to perform is to review and save the reports. Here, QuickBooks may send you a link through which it will verify the QuickBooks bank reconciliation report. The detailed steps are:
Tap on “View Reconciliation Report,” after which you can check the summary details and related details, including outstanding or unpaid checks. You can easily find this info within the “Additional Information” tab.
Tip: It is recommended to review monthly reports to monitor your transactions. Contact employees and vendors to know if their checks need re-issuance. After you have checked all these things, QuickBooks bank reconciliation can be considered complete.
Reconciliation Process in QuickBooks Desktop
Below is the process for reconcile in QuickBooks desktop:
Begin with Reconciliation Window
First of all, after opening QuickBooks, come to its reconciliation window. You can either use a credit or bank card to reconcile the information. After that, you can review the related information. Remember to verify that all information in this window is precise and accurate before moving ahead to the next step. Let’s check the steps on how to reconcile credit cards in Quickbook Desktop in detail:
- First of all, open Quickbooks.
- Go to the Banking option.
- Tap on Reconcile.
- Navigate to the Account tab.
- Choose the credit or bank account to reconcile.
- You can see the Statement Date there. You can change it as per your requirement. You will also see the Beginning Balance there, which is the total of previously clear transactions. Moreover, verify that it is exactly the same as the opening balance on your Statement.
- Within the Ending Balance section, provide your Statement’s corresponding balance.
- In case your bank statement shows earned interest or displays service charges that you mistakenly forgot to enter in QuickBooks. Provide that amount in the section named “Service Charge and Interest Earned.”
- Tap on Locate Discrepancies to check available reports to track errors and other reconciliation issues. Moreover, you also get the option of Undo & Restart Reconciliation if such a thing happens.
- For that, tap on the Undo Last Reconciliation tab if the fixing process needs you to undo the previous reconciliation.
- Verify the information provided by you and tap on Continue to move to the Reconcile window to confirm that the process is completed.
Read Also: How to Resolve QuickBooks Bank Feeds IssueConclusion
Reconciling in QuickBooks Desktop and Online versions is fairly straightforward. Reconciling in both these versions is a three-step process: compare transactions, resolve differences, and finalise reconciliation. However, there are a few differences that you should be aware of before starting the process.
By following these simple steps and using the tips we have provided, you should have no trouble completing the reconciliation process in either version of QuickBooks.