QuickBooks multi-user mode enables users to access the specific company file from different computers and places. All they require is to connect them to one network to use this function. QuickBooks is known for its productive and dynamic features. However, a multi-user connection enhances its productivity in a better way.
If the company file requires more than one user then consider this guide and learn how to set up a multi-user setup on a QuickBooks desktop.
What is a multi-user network in QuickBooks?
A multi-user network enables multiple users to work on the same company file. They can easily tackle all the tasks by working at any time on a QuickBooks file. This mode would provide you with lots of advantages if have a big business.
Everyone should include multi-user mode whenever there requires more than one user. You are also required to receive a licensed copy of the software. Well, these are not the only requirement that you need to fulfill. But, lots of others. So, just move in and learn
Specific requirements for QuickBooks multi-user mode
- Examine that the QuickBooks database server manager is running on your system.
- Also, provide Windows login admin.
- Make sure to install QuickBooks users before switching to the multi-user mode.
Simple facts related to QuickBooks multi-user mode setup
The mode aids in providing access to QB files to several users by connecting to one specific network. Every associated user needs to install QuickBooks on their devices. As QuickBooks comes in various editions and versions so the limit of multiple users is varied. The pointers below will help you to understand it better.
- QuickBooks premier only allows 5 users.
- While QuickBooks enterprise solution comes with 30 users’ access
- And, 3 users get access to QuickBooks pro.
Procedure to setup multi-user network in QuickBooks desktop
Now, we are heading toward your query and learning how to set up a multi-user network in the QB desktop. Make sure that the whole procedure consists of seven steps. Also, you are not required to skip any steps below.
Step 1: Download and Install QB Desktop
- To begin, download the QuickBooks software.
- Then, just save the file anywhere you prefer.
- Consider the steps below to install QuickBooks.
- Pick the Custom and Network install button when you are asked to choose the install type.
- Also, click another tab “I’ll be using QuickBooks desktop on this computer, AND I’ll be storing.” If you want to use QuickBooks desktop full version on the server.
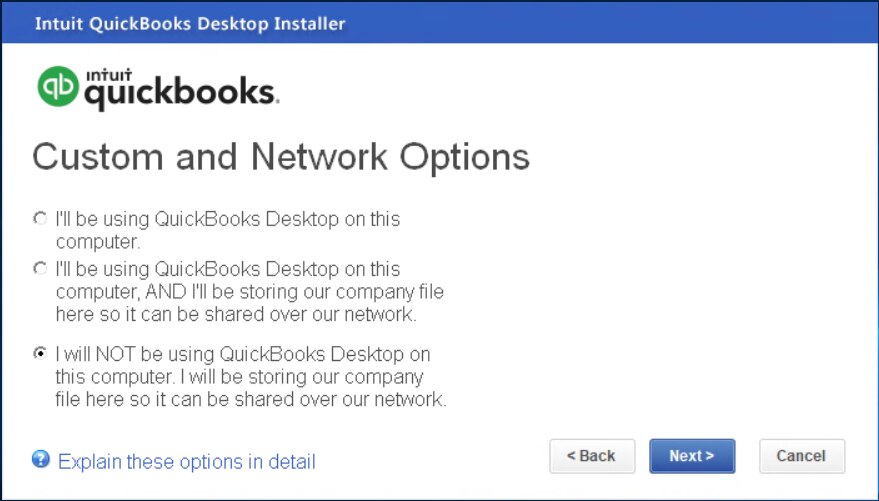
- Meanwhile, choose another option for the opposite situation.
- Then, go through the steps appearing on the screen.
- Try to put an end to the installation.
- Thereafter, pick a multi-user host installation.
Also Read : How to Fix QuickBooks Bank Feed Not Working Issue
Step 2: Switch to a multi-user host
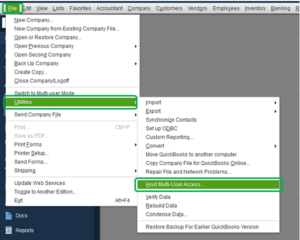
- Access QuickBooks in the first place.
- Also, update the QuickBooks company file to the newest version available.
- Consequently, navigate towards the file.
- Choose Utilities.
- Then, tap host multi-user access.
Step 3: Configuring firewall and security setting
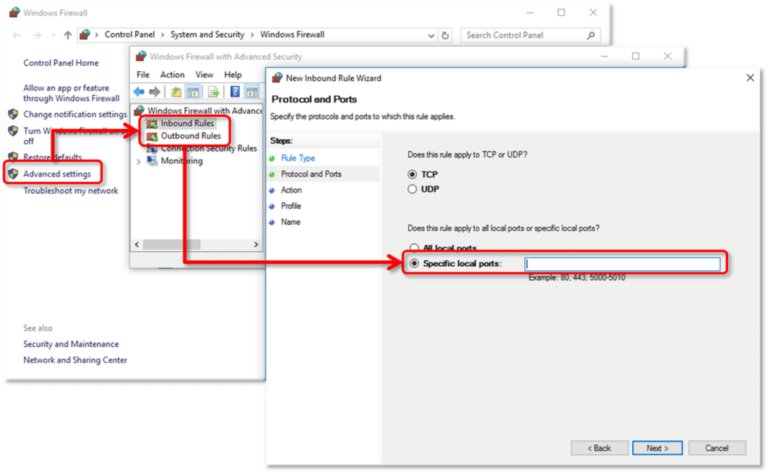
- Initially, click on the start menu.
- Also, examine the firewall setting.
- Click on the Windows firewall.
- Subsequently, choose the Advanced settings button.
- Make sure to opt for the inbound rules.
- Hit New Rule.
- Once done, you need to choose Port.
- Verify the TCP option.
- Don’t forget to specify the ports required for your QuickBooks yearly version.
- Pick another tab Allow the connection.
- Thereafter, checkmark all the profiles.
- Conduct the next step by moving towards the Next button.
- Specify a name to the rule.
- Then, choose Finish.
- Just stop this procedure here by accessing QuickBooks in the multi-user mode.
Step 4: Share QB files
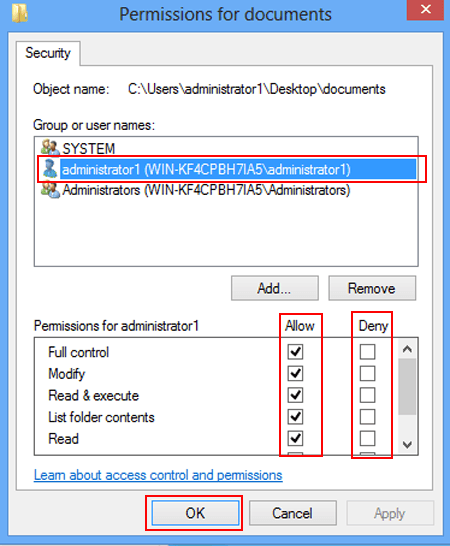
- Locate the folder which has the company file.
- Then, right-click on the same.
- Visit the Properties button.
- Choose Security.
- Also, hit the Edit button.
- Make sure that you need to click on the QBDataServicesUserXX.
- Assign the full control access.
- Thereafter, choose Allow.
- In the subsequent step, select Apply.
- Afterward, hit OK.
- Try to set up the Windows access permissions.
- In the end, just share your QB files.
Windows 10, 8, 7
- Press Windows + R button in the first place.
- Just access the File Explorer button.
- Now, you try to locate the folder storing the QB files.
- Make sure to right-click on it once you find it.
- Consequently, click on the Properties and sharing button.
- Also, hit Share ad.
- Moving further choose the related service QBDataServiceUserXX.
- XX here represents the QuickBooks version.
- Once done, hit the Full Control.
- Thereafter, choose Share.
Step 5: Setup QuickBooks Database Server Manager
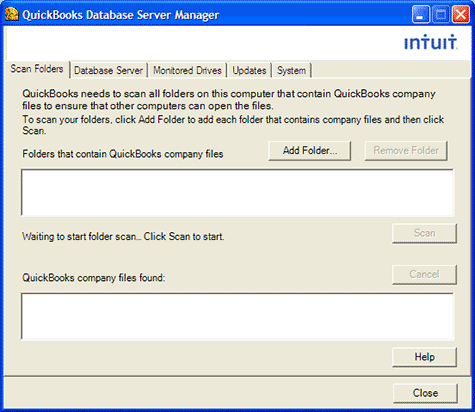
- To start with, you need to tap Start.
- Now, you will see the Programs and QuickBooks option.
- After that, hit QuickBooks database server manager.
- Make sure to click on the Scan folders button.
- Tap Add folder consequently.
- Meanwhile, you need to pick the folder containing the QB file.
- Hit OK
- Click on the Add folder button.
- Choose Scan button
- Start the scanning procedure.
- Finally, just hit Close.
Check Out : Fix QuickBooks Won’t Print Issues: The Complete Troubleshooting Guide
Step 6: Insert Windows Admin Rights
Windows 10:
- Pick the Start button.
- Choose the following tabs settings > accounts > family & other users.
- Then, you need to click on the add somewhere else.
- Meanwhile, choose I don’t have this person’s sign-in information.
- Try to add a user without using the Microsoft account.
- Thereafter, provide a new name and password.
- Choose the Finish button.
- Make sure to give the essential admin rights to a newly created user.
- Click on that specific account.
- Also, pick the account type.
- Go through the drop-down list and pick the Admin option.
- Just hit OK
- And, then save the option.
Windows 8 and 7
- Make sure to tap Ctrl and R buttons.
- Just access the Control Panel.
- Pick User Accounts > Manage another account > Create a new account.
- Signify the user name.
- Also, pick the Admin button.
- Just hit Create.
Step 7: Try to access the QB file
- To start with, navigate toward the QuickBooks file menu.
- Also, choose the tab named switch to multi-user mode.
- Hit Yes on the multi-user setup hosting window.
- Thereafter, press OK.
- Now, visit the company tab.
- Click on the Setup users and passwords.
- Thereafter, the user needs to choose the setup users button.
- Make sure to add a user.
- Then, just end the process and access QuickBooks.
So, this is all about the setting up of QuickBooks multi-user mode. We hope that you have successfully conducted the steps and completed the procedure. However, if you find any other QB issues or errors while working then make sure to tell us in the comment below. We would get back to you as soon as possible so don’t hesitate to resolve your queries with us.
Frequently Asked Questions (FAQs)
1. How to use QuickBooks Desktop 2022 for multiple users?
If you want to use multiple users then consider these simple steps:
- Download and Install QuickBooks desktop
- Switch to multi-user mode
- Configuration of firewall and security
- Share QB files
- Setup QuickBooks database server manager
- Give Windows Admin Rights
- Try to access the QB file.
2. How QuickBooks Database Server Manager helps in running multi-user mode?
QuickBooks database server manager contains the .nd file. This file is responsible for connecting the workstations to the server. No user on the workstation can access the company file if the file gets damaged or corrupted. So, it’s more than a bridge filling the gap between workstation and server. The tool automatically creates the file to fix all the network and connectivity issues that occur while accessing QuickBooks in a multi-user environment.
3. How can I download the QuickBooks database server manager from the QuickBooks tool hub?
The user is only required to follow some steps to use the QuickBooks database server manager from the dynamic tool hub. So.
- First of all, open the QuickBooks tool hub.
- Visit the Network Issues.
- Thereafter, click on QuickBooks database server manager.
- The tool will start working on the device.
- Not only it will help in generating the .nd file but also remove all kinds of bugs and issues while connecting to a network.
4. Can several users access the QuickBooks desktop?
Yes, the QuickBooks multi-user mode enables multiple users to work on the company file at the same time. You can enable the mode to witness its amazing functions.
5. What is a multi-user network?
A multi-user network often refers to the various computers or workstations connected to the same network or server. While connecting, the user of workstations can access the QB files at any particular time and period.

