
QuickBooks keeps the work going by providing several dynamic features in one place. However, it does not rescue itself from kinds of issues. This guide will be going to discover one such issue known as the QuickBooks abort error. It occurs when there is a damaged QBWUSER.ini file.
This file is essential for the functioning of QuickBooks. You may end up with a request from the software to abort QuickBooks if it gets damaged and corrupted. Moreover, the error occurs with a text that reads “Connection has been lost”. Here is what you need to know more about this issue.
What is QuickBooks Abort Error?
While using multi-user mode, QuickBooks requires a configured network to connect with other workstations. However, if the network file or QBWUSER.ini file gets corrupted, it can lead to various issues. QuickBooks abort error is one among them.

It occurs as “Problem: The connection to the company file has been lost. QuickBooks must close immediately. Any unsaved data will need to be re-entered.” The error needs to be resolved easily while rooting out every cause and reason. So, move below and learn what leads to the issue.
Why Does QuickBooks Keep Aborting? (Reasons)
A handful of reasons are responsible for the QuickBooks abort error. Such as:
- Any Hardware issues or damaged windows may be a reason for the error occurrence
- If the QBWUSER.INI file is damaged or missing, the error definitely emerges.
- Installed Firewall and Antivirus in your system, clashing with the QuickBooks processes and making QuickBooks abort its current task.
- Configurations of different versions of QuickBooks clash within a multi-user setup.
- Multiple computers are hosting the QuickBooks company file.
- Sleep or hibernation mode is turned on while the computer is saving the company files.
- A disruption in the flow of data between devices storing the files. (This happens only when the files are saved and stored on different devices, whereas your computer is on the network)
Symptoms of QuickBooks Abort Error
The following are all the signs and symptoms that help you to identify the error.
- While working with QuickBooks, it shuts down automatically.
- The computer system crashes randomly.
- It is also possible that QuickBooks may crash with no message on the display.
- If the computer system has Windows 8 then QuickBooks gets terminated frequently when this error appears.
- Receiving a QuickBooks unrecoverable error on the device.
- The user has closed the Fatal app.
How to Fix QuickBooks Abort Error?
Now that you have discovered all the causes and symptoms, it’s time to move in and explore how to fix the QuickBooks error.
Method 1: Use QuickBooks Install Diagnostic Tool
The very first and foremost method to resolve the QuickBooks Abort error is to apply the QuickBooks Install Diagnostic Tool, as this tool analyses and highlights faulty Windows components. This would fix the problem on its own.

- Go to the official site of Intuit to download QuickBooks Install Diagnostic Tool (you can either install QuickBooks Tool Hub to use the QB Install diagnostic tool).
- Now double-click on the icon to launch the tool to scan your system.
- After the scan process is completed, this tool gives you the results.
- If the result is “No error detected,” then the file is ok.
- If the result is “Error detected” then proceed further.
- Repair the file and then restore the backup.
- The users are recommended to restore the backup through QuickBooks Auto data recovery.
Method 2: Rename the QBWUSER.INI File
Renaming the QBWUSER.INI file helps the user to resolve the error, but renaming this file may delete the last list of files opened, which means users have to redo the same thing manually.
- The first and foremost thing for you to do is to examine where you have saved the QBWUSER.INI file.
- Go to the following path:\[user name]\ AppData\Intuit\QuickBooks [year]\ to spot the company file.
- After that, pick the QBWUSER.INI file.

- Also, perform a right-click on it to choose the Rename option.
- Try to create a backup of the issue.
- Thereafter, add.OLD towards the end of the file name.
- You need to rename the .ecml file.
- Make sure to save it as well.
- Just access the file.
Method 3: Scan the Error Through QuickBooks File Doctor
QuickBooks file doctor is a tool that resolves multiple QuickBooks Errors that are related to file issues. As the name suggests, this tool works as a real doctor to every bug in the QuickBooks file and resolves each error and bug.

- First of all, you need to download the QuickBooks File Doctor tool.
- After that, save the file on your device.
- Now open the file you downloaded, which is saved as QBFD.exe.
- After that, the users need to follow the onscreen commands to install the QuickBooks file doctor tool.
- Once the installation process completes, the tool will run automatically. You can also run the file doctor tool by double-clicking on it.
- The scanning process will determine the error and resolve it in no time.
If this method fails to redeem the error, then move ahead with the next method.
Method 4: Test the QuickBooks’ Hosting Status
In terms of resolving the QuickBooks Web connector Application to abort Error, the users need to check the QuickBooks hosting status by following the steps.
- To initiate, move toward the File menu.
- Then, click Utilities.
- Choose to Stop Hosting multi-user access.

- Now, just access the company file with multi-user access.
- Try to find out the box named Open file in multi-user mode and put a check mark on it.
Now check whether the error is gone or not. If not, then try out the next method to resolve the error.
Method 5: Manually Configure Firewall Settings
- First of all, access the Windows Start menu.
- Then, specify Windows Firewall.
- Also, choose Enter.
- Pick the Advanced Settings tab.
- Right-click on the Inbound Rules.
- Thereafter, choose New Rule.
- After that, you need to choose the Port button.
- Hit Next.

- Meanwhile, a new window will pop up.
- Put a mark on the TCP option.
- Head towards the Specific local port field and specify the specific ports.
- Fill up according to the QuickBooks years.
- Choose Next.

- Click the Allow the Connection button.
- Hit Next.
- Consequently, just ensure that all the profiles have been marked.
- Click the Next button.
- Try to make a rule while specifying a name for it.
- Hit the Finish button and end this procedure.
Also Read: How to Set up Multi-User Network in QuickBooks Desktop?Method 6: Running Verify and Rebuild Data Utility
- First of all, go to the QuickBooks Desktop and then select the File menu.
- Now navigate to the Utilities tab and click on the Verify Data option.
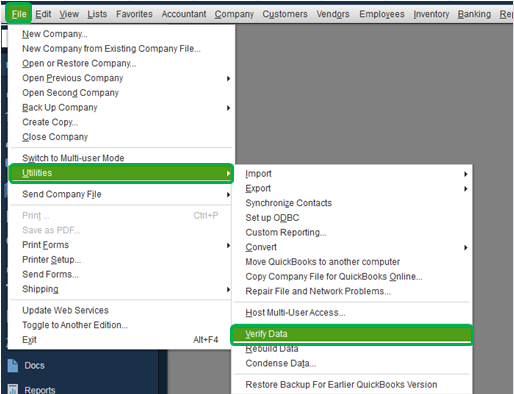
- Clicking on the Verify Data option may give results in two cases.
- If there is no message appears after verifying the data, then you are required to run the Rebuild tool.
- If the error message appears stating “Your data has lost integrity” on the screen, then you will need to repair the damaged data file.
- Now, go to the Utilities Tab under the File Menu and also click on the Rebuild Data option.
- A pop-up window will open up, click on the ok button on it.
- Now, select the location on the system to save the backup of the company file and then hit the ok button.
- Moving further, the user has to check that the Data Rebuild Process has started.
- The last and final step is to restore the backup option from the file menu.
Method 7: Disable Antivirus and Windows Defender
Here are the steps to disable both of them:
Antivirus Program

- To begin, log in to the antivirus software.
- Also, move towards the settings of the program.
- Try to spot the right option for disabling the program.
- Then, just save all these changes.
- Restart your computer.
Windows Defender

- Tap on the space located beside the Windows bar.
- Enter Windows Defender there.
- Hit on the very first option.
- Try to find out the relevant option that will help you to disable Windows Defender.
- Just save all these changes.
- Finally, restart the computer.
Method 8: Fix Through the Task Manager

- To initiate, close your QuickBooks software.
- Also, end the QB program in the task manager.
- Try to highlight all the QuickBooks applications and software.
- Hit the Stop Task button.
- Run the repair on QuickBooks and end this procedure.
Method 9: Permit the QuickBooks Installation Folder to be used
- Once your Windows File Explorer has launched, navigate to the following address: C:/Program Files/Common Files.
- To change the standard files folder’s security settings, right-click on it and select “Properties.”
- Proceed to security to select the edit option.
- Click on users, which is further ahead of the group or usernames.
- After that, make the necessary changes and activate the write, read, execute, and read rights.
- Click the Apply tab as well.
- Then, tap “ok” to finish the process.
Read More: Fix QuickBooks Error PS036 | Payroll Subscription IssueMethod 10: Make a New Administrator User in Windows

- To open the “Run” command prompt on your keyboard, press the “Control + R” keys.
- Then, enter “Control Panel” and then hit the “OK.” Next, launch the “Control Panel” settings.
- Click on the “Create a new account” option under the “User Accounts” icon and then select the “Manage Another Account” icon.
- At last, type the correct user name, select “Administrator,” and tap on the “Create” option.
Thus, following the proper approach, you can quickly resolve the QuickBooks abort error.
Conclusion
So, these are all the ways through which you can resolve QuickBooks abort errors. You will no longer witness the same error again if you root out these causes. We hope that the solutions above have helped you in so many ways. However, if there is anything that you want to ask, then let us know in the comments section. We will get back to you immediately. So, don’t hesitate to write down your queries and problems.