
QuickBooks act as a savior for many small and medium-sized businesses. It is easy to use and helps in maintaining records, creating invoices, making payments, and several other accounting relating tasks. But sometimes users may find some errors which may put them in a panic situation. So, QuickBooks Error 324 is one such error that occurs when QB is not able to find your account on your bank website.
But you do not need to worry, we got your back. In this article, we are going to tell you about QuickBooks error 324 in detail. We will discuss everything from its reasons to symptoms, along with all its possible solutions. So without any further ado, let us witness the best possible solutions which will definitely fix this error. Let’s begin.
What is QuickBooks Error 324?

QuickBooks Error 324 is a banking error. It prevails when QuickBooks is facing issues in finding your account on your bank or credit card website. It can happen because the bank has changed your account or shifted it to a new server or you have made any changes to your bank website.
Why QuickBooks Error Message 324? (Possible Causes)
- QuickBooks corrupt downloading
- RAM lacks memory
- QuickBooks Incomplete Installation
- Corruption within the Windows registry
- Attacks from viruses and malware activities
- Another program on our system may have accidentally deleted any QuickBooks-related files
- Choosing the same name for two simultaneous accounts of QuickBooks online
How to Identify QuickBooks Online Error Code 324?
These are some of the symptoms which notify the users about QuickBooks error message 324.
- This error appears on the screen with an error message.
- The computer starts crashing for a certain period.
- The system starts freezing for a few seconds at a time.
- When the Financial institution account is moved to the new server or reclassified the account.
- If the Financial Institution published a new account number or credit card.
- This error also appears when the ID of the account and the credit card account get closed.
Also Read: What is QuickBooks Database Server Manager
How to Resolve QuickBooks Error 324?
To resolve error 324 QuickBooks online, the user can select any of the methods explained below. But It’s recommended to move correspondingly. You may not receive the desired results if trying out solutions according to your choice. Also, there is no need to perform every other method after the error is resolved. Let’s check out the following solutions to get rid of the QuickBooks online error 324.
Solution 1: Repair Registry Entries
- To initiate, hit the Start button.
- Then, click on the blank field to search for the command.
- Hit the Ctrl + Shift keys.
- Also, hit Enter.
- Choose Yes when a permission dialogue box appears.
- Thereafter, specify regedit inside the search field.
- Now, hit Enter.
- Pick the error 324-related key for backing-up purposes.
- Click on the File menu and hit the Export button.
- Navigate towards the Save in the list and try to save the QuickBooks backup key.
- Enter the appropriate name for the backup file.
- Choose the box titled Select branch to Export.
- Tap Save after performing these steps.
- Thereafter, just save the files as a .reg file extension.
- Try to back up the QuickBooks in the last step.
Solution 2: Clean System Junk
- Tap the Start button.
- Specify Command.
- Press Ctrl + Shift buttons together.
- Then, hit Enter.
- Choose Yes on the next prompt.
- Specify Cleanmgr and press Enter.
- Checkmark the boxes that you want to clean inside the box of disk cleanup dialogue box.

- Finally, just press OK.
Solution 3: Use Windows System Restore
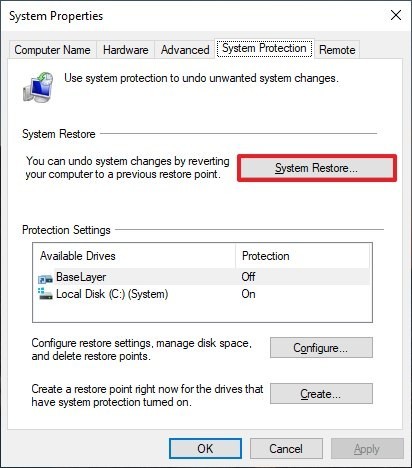
- First of all, hit the Start button.
- Then, specify System Restore inside the search box.
- Hit Enter.
- Go to the menu bar to choose the System Restore tab
- Put in the admin credentials.
- Consequently, go through the steps to pick the restore point.
- Just complete the procedure.
Also Read:Every Possible Solution to Fix QuickBooks Error 179 Like A Pro
Solution 4: Run Windows File Checker
- The first and foremost step is to hit the Start button.
- Then, specify the command inside the field.
- Furthermore, hit Ctrl + Shift buttons together.
- Also, hit Enter.
- Choose Yes when the permission dialog box prompts.
- Just specify SFC or Scan Now tab.
- Go through the instructions and hit Enter.

Solution 5: Install Windows Update
- Initiate the procedure by hitting the Start button.
- Specify Update in the search box.
- Hit Enter.
- Just download the updates whenever you want.
Solution 6: Uninstall and Reinstall QuickBooks
- Initiate the procedure by moving toward the Control Panel.
- Hit the Programs and Features tab.

- Then, move toward the name column.
- Try to spot the QuickBooks error 324-related programs.
- Make sure to pick the same.
- Once done, hit Uninstall button.
- Wait till the procedure is going on.
- Finally, just try to reinstall and download QuickBooks software.
Solution 7: Update System Drivers
The error may interrupt when PC drivers are outdated or they contain some bugs inside. So, it is recommended to update them to the newest available release. Make sure to specify the updated driver on the search panel to conduct this procedure.
Solution 8: Conduct a Malware Scan
The solution would help in diagnosing corrupted and malware infections. Therefore, try to run a malware scan on your device. For this, you will need to download and install an Antivirus on your PC. Once you have the antivirus in your system, now start the scanning process. Depending on your PC and the amount of data stored in it, the scanning process can take a few minutes. At the end of the scanning process, you will get to know about the files that contain malware. You can delete or repair those files or folders to protect your computer.
Solution 9: Utilize the QuickBooks Tool Hub

QB Tool Hub is here to help you resolve any issues or bugs your application may encounter. To handle the diverse problems, it is divided into separate sections of Quick fix my file, QuickBooks file doctor and more. Use these steps to get the QB Tool Hub:
- Visit the official QB website.
- Locate the QuickBooks Tool Hub download link.
- Save this file to a location of your choosing.
- Click twice on the QuickBooksToolHub.exe installation file; it’s there now.
- When the installation wizards appear, they will assist you in completing the process.
- Start using the tool hub after setting it up.
Run the QuickBooks Install Diagnostic tool to determine whether QuickBooks problem 342 is due to an incorrect installation. The tool is located in the section on Installation Issues. Additionally, Quick Fix My Program is available under the Program Issues menu.
Conclusion
All in all, QuickBooks error 324 is a banking error that can occur due to various reasons like corrupt downloading of QuickBooks, lack of memory in RAM, incomplete QuickBooks installation, and corruption within the Windows registry. However, the good part is, this issue can be resolved.
So, in this article, we told you about the recommended solutions for QuickBooks error code 324. We hope that the guide above has resolved all of your queries regarding the issue. However, if you want to explore more about QuickBooks and its functions then check out the site. The experts themselves have prepared this platform to help out users worldwide. Therefore, make sure to take assistance from them when the solutions to any QuickBooks Errors would not help you.