
QuickBooks Desktop helps businesses effectively handle payments by streamlining the check writing and printing process. By configuring your printer and selecting the Standard, Voucher, and Wallet check types, you can save time and minimize errors by writing and QuickBooks check printing individually or in batches. This tutorial offers detailed steps on QuickBooks check printing for bills and paying vendors to ensure accuracy and streamline financial processes.
Are you having trouble in QuickBooks check printing and how you want them to do? If so, this site is for you; keep reading until you find the answer. All small and mid-sized businesses can use QuickBooks, a robust accounting program Intuit launched. In addition to monitoring overall accounting activity, it lets you maintain tabs on income, expenses, & accounts receivable and payable.
Additionally, customers can print one check or several checks, depending on their needs, to pay suppliers, staff, or other general expenses. With QuickBooks, you can handle your bills and payments by entering bills or writing checks.
Write checks
The most straightforward approach to registering payments is to “write checks.” You must use this method when you wish to pay bills, when you receive them, or when no bill is accepted.
Enter bills
“Enter Bills” is the suggested method for adding bills in QuickBooks. These bills document transactions that must be paid later, such as costs incurred, supplies acquired, or QuickBooks vendor services rendered. This allows you to monitor your accounts payable and determine which bills need to be paid and when.
Why is there a need for QuickBooks check printing?
Numerous tools in the Desktop version make QuickBooks check printing more efficient. It allows you to:
- Print several checks in one batch or a single check at a time.
- Save a check for later printing.
- Print many check types.
- Once checks are printed straight from QuickBooks Desktop, the payee information is filled in using your vendor contact details. Additionally, the sum for the registered bills is finalized. You can use a single check to pay several invoices at once.
How To Do QuickBooks Check Printing?
Please be informed that the same procedure is used for QuickBooks check printing in various versions, such as Desktop Premier, Pro, Enterprise, and Accountant.
Here’s how to do QuickBooks check printing when the bills are received on the QuickBooks desktop.
Step 1: Setup your printer
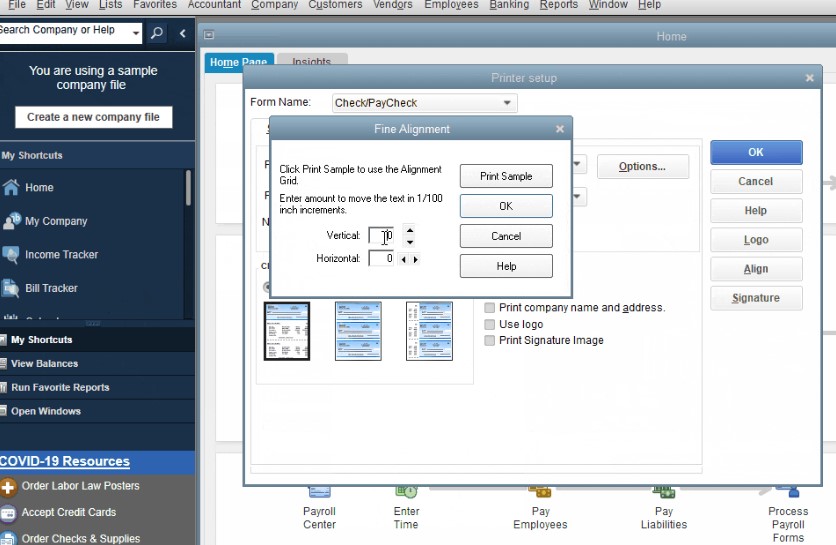
You need to have the printer configured correctly in QuickBooks Desktop before you can proceed with QuickBooks check printing.
Follow these steps to configure your printer:
- From the File menu, select Printer Setup.
- Select Paycheck/Check from the Form Name drop-down menu.
- From the available check styles, select a voucher.
- Choose Align, click Print, adjust the vertical & horizontal settings, and click OK.
- Select the Print Sample option.
- If you want to make more changes, press Align again before printing another sample.
After successfully configuring the printer, you need to go on to do QuickBooks check printing.
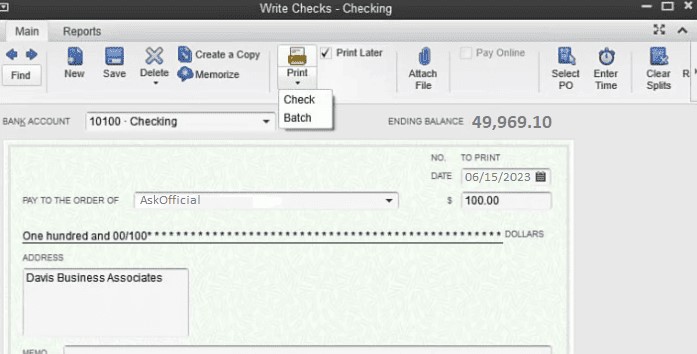
Step 2: Proceed to write checks
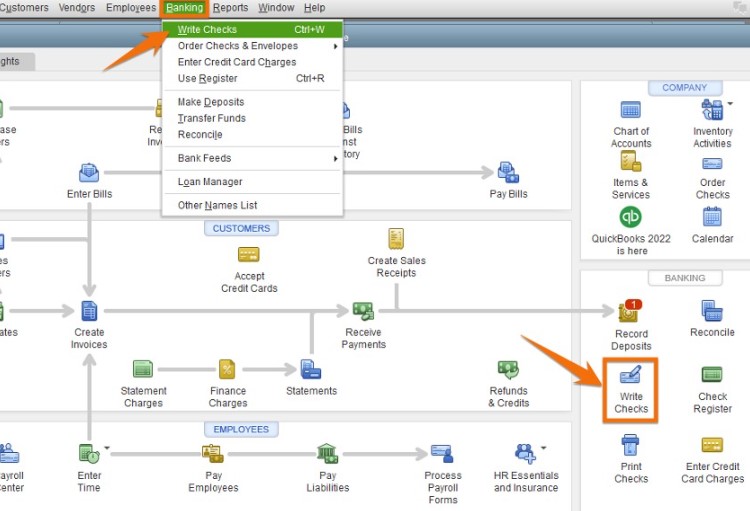
- Navigate to the Banking menu at the top of your dashboard.
- Then, select Write Checks from the drop-down menu.
- You can also write checks in your home page’s banking area.
Step 3: Get ready for the check
The Write Checks page will now appear in QuickBooks Desktop.
You must enter the necessary information in QuickBooks Desktop for preparing your check, including:
- Print Later: Select this option if you intend to create the check immediately but print it later as a necessary component of that batch. By checking this option, you change the check number on the check preview and the phrase “To Print.”
- Number: If the check is being printed, enter its number before inserting it into the printer. If the “Print Later” option is selected, it will read “To Print.”
- Address: This option is automatically filled out depending on the information entered during the payee setting.
- Items or Expense tab: The check can be assigned to a specific QuickBooks account, Item tab, or either to several QuickBooks Accounts, similar to adding a bill
- Bank account: Select the specific bank account that will be used to receive the funds.
- Pay to the order of: The payee’s name should be added. The address detail will then be completed automatically.
- Date: Enter the date that you plan to issue the check.
- Amount: Put the sum in.
- Memo: This field is not required. However, you might provide more information in this box, including the account number.
Finally, click the Save tab at the top of the Write Checks screen; do not click the window close button.
Read More: QuickBooks File Doctor | Install & Fix QB Errors
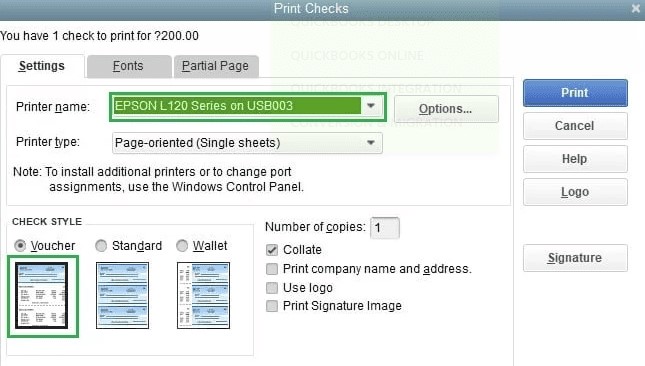
Step 4: Print the check

QuickBooks check printing at a time or several checks at once is now more straightforward. To select, click the drop-down menu under the Print icon at the top of the Write Checks box.
Let’s take a look at the procedures below to understand QuickBooks check printing in batches or one at a time:
- Choose the Print icon via the Write Checks box, and then choose: To print a single check, select the Cheque option.
- When asked, input the printed check number.
- To finish the printing process, adhere to the on-screen directions.
Batch printing
After finishing the check preparation procedure, hit Save and New to create all the necessary checks. Ensure that the Print Later box is positioned at the top of the Write Checks window for every check. Click Batch after choosing the print icon’s drop-down menu from the last check.
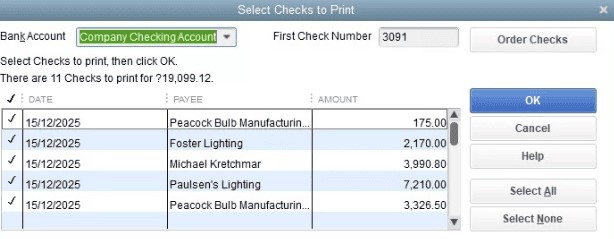
All produced checks that have not yet been printed will be shown on the Select Checks to Print screen.
- First, decide which bank account will be used to write the cheques.
- To check the box next to the check, click it now. Make a note of the checks you must print.
- In the First Check Number section, enter the check number from the first blank check you put in the printer, then click.
In the Print check window:
- The Print Checks panel will open.
- Select the printer type and name.
- Choose between printing as Wallet, Standard, or Voucher under the Check Style area.
- Uncheck the box for “Print company name and address” if your company’s name and address are already printed on your pre-printed checks.
- Check to make sure all other settings are accurate.
- To complete, click Print.
The procedure for printing a single check is now identical. After selecting the check style and your printer, click Print.
Read More: How To Create & Record Sales Receipt QuickBooks Online
How do you write and print checks for the bills already entered on the QuickBooks desktop?
To do this, follow the steps given below:
Step 1: Select Pay bills
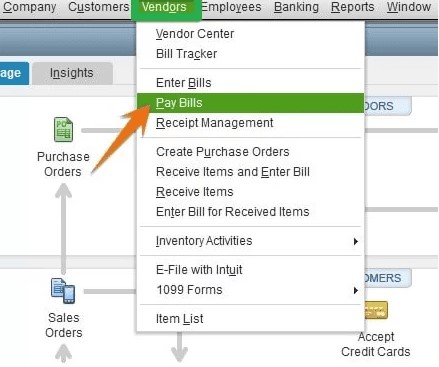
Select Pay Bills from the Vendors option on your QB Desktop home page.
Step 2: Choose the bills you intend to pay
The screen will display a list of bills already inputted into QuickBooks Desktop. Click the checkbox on the left to select the bill or bills you must pay.
Step 3: Get the check ready
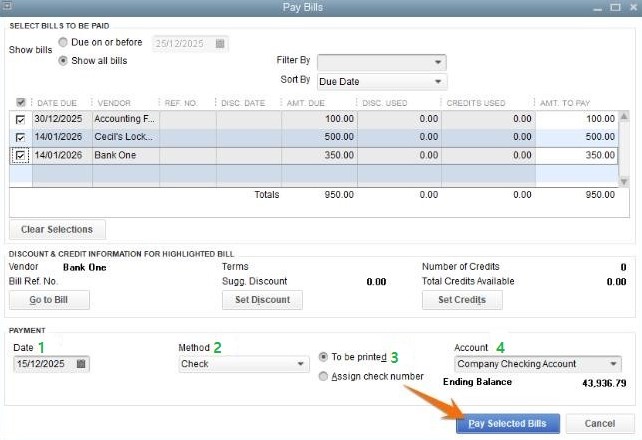
You must provide the necessary data listed below to generate the check-in QB Desktop:
- Account: Choose the checking account that will be used to settle the checks.
- Date of Payment: Indicate the date you want the cheque to be prepared.
- Method: From the drop-down menu, select “check.”
- Check Number: Click “To be Printed” or assign a check number. If you select “To be Printed,” the check number is assigned automatically upon printing.
To generate the checks, select the Pay Selected Bills option.
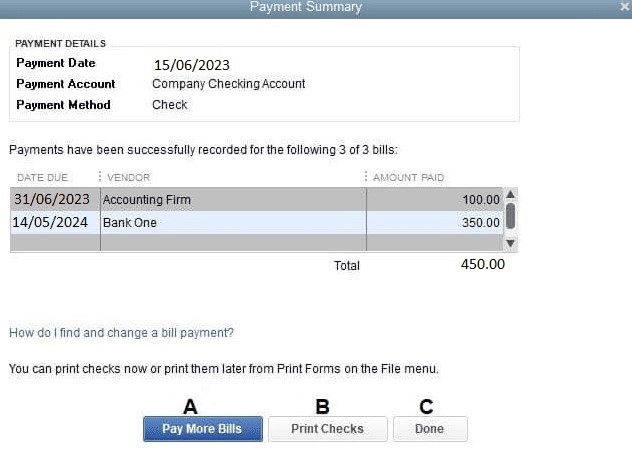
Step 4: Print checks or settle other bills
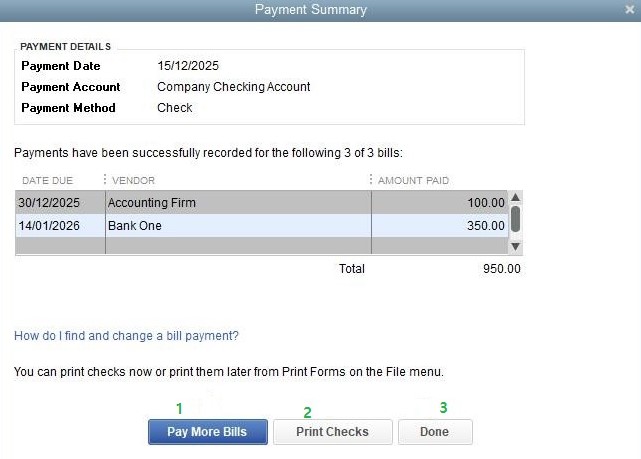
After selecting the Pay Selected Bills option, a payment summary will appear in QuickBooks.
You’ll be capable of the following:
- Pay Additional Bills: Click this link to generate checks to pay additional bills.
- Print Checks: Select the Print Checks tab to print your checks.
- Done: Select the Done tab to print the checks later.
Read More: QuickBooks Registration Error | Fix Using Simple Methods
Step 5: Find the checks that aren’t printed
After a while, you can locate the unprinted checks by selecting Print Checks in the specific Banking area of your home page.
Step 6: Print the check
- The list of unprinted checks page opens when you click Print Checks.
- After choosing which checks you want to print, you must click OK.
- Please ensure that the number of the first check in your printer matches the number accessible in the First Check Number column.
- The last step is to choose the check style, hit on your printer, and click Print, as explained in the section above.
How and what kinds of checks can be printed in QuickBooks?
QuickBooks Desktop supports three check kinds: voucher checks, standard checks, and wallet checks.
- Voucher Checks: Perfect for payroll and recordkeeping, voucher checks include attached vouchers that offer comprehensive transaction information. These checks ensure correctness and save time by integrating smoothly with QB on laser printers.
- Standard Checks: Ideal for paying bills or vendors in bulk, standard checks are three per page. They provide your company with a polished appearance and work with most printers. You can also personalize them with your logo.
- Wallet checks: These are handy for unforeseen expenses or situations where portability is essential. They are smaller (6 x 2.625 inches) and made to fit in a wallet.
Thus, QuickBooks check printing is as easy as choosing the check type, adjusting the print parameters, and printing from the printer of your choice.
What are the required fields for writing a check?
Several necessary fields must be filled out when writing a check:
- Bank Account: Decide which bank account money will be taken out of.
- Ending Balance: This shows the chosen bank account’s balance on the day the check was written.
- Pay in the following order: Enter the name of the person for whom the cheque is intended or the payee.
- Number: Your QuickBooks choices will determine the check number.
- Date: Enter the check’s issuance date.
- Quantity: If you enter the dollar amount, it will automatically appear in words beneath the payee’s name.
- Address: The payee’s address will automatically be filled in based on the previous configuration.
- Memo: Additional payment-related remarks are frequently entered in this field. However, it can be left empty.
- Print Later or Simply Pay Online: Select the option that best suits your needs: QuickBooks check printing later or pay online.
- The Purchases or Bills tab: This tab allows you to enter shipping charges and other commitments unrelated to QuickBooks transactions.
- Expense tab: This tab is used for generic costs unrelated to QuickBooks items.
- Item tab: Use the item tab to choose relevant items from a list of choices.
- Save & Close: Click Save & Close once all required fields have been filled out.
Read More: Resolve QuickBooks Printing Problems With Invoices
How do you print the check register in QuickBooks Desktop?
Follow the steps given below:
- Choose use register from the edit menu.
- Click ok after selecting your account through the drop-down option.
- At the top of the register, click the Print icon.
- Indicate the range of dates that will be printed.
- Check the Print Splits detail box if you wish to add split details.
- To finish the procedure, click OK and choose Print.
Void and delete checks in QuickBooks desktop
Ensure you understand the difference between removing and voiding a check before starting.
A voided check has no value and is in worthless condition. VOID is now included in the Memo field. It is always possible to re-enter a voided check. Do this if you value maintaining a record of the check-in QuickBooks. The transaction record is likewise erased when a check is removed from QuickBooks. It will seem as though it will never occur. A deleted check can be re-entered, but this cannot be reversed.
Voiding a written check
- Click on the Banking menu and select Use Register.
- Choose the account you used to write the check using the drop-down option.
- In the Bank Register, the check is chosen.
- From the QB Edit menu, select Void Check.
- Press the “Record” button.
Voiding a blank check
- The check should have been made out for $0.00.
- Enter the payee’s name and designate an account in the Expenses section.
- Select Void Check from the Edit menu.
Deleting a check
- Click on the banking menu and select Use Register.
- Choose the account you used to write the check using the drop-down option.
- In the bank register, the check is chosen.
- Click on the QB Edit menu and select delete check.
- Press the “Record” button.
Read More: How To Setup & Use QuickBooks For Personal Finance
Memorizing checks In QuickBooks Desktop
Here are some points for memorizing checks:
Establishing a Vendor Automatic Recurring Payment
In the QuickBooks desktop, you can save time by setting up an automatic recurring payment (check).
Find the Current Check or Make a New One
- If you already have a check in hand
- If a check for the merchant already has the amount you want to pay on it, find the check from any of the following:
From register
- After choosing Banking at the top, select Use Register (or press Ctrl+R). Pick the appropriate one from your several bank accounts.
- Find the check & double-click on it to commit it to memory.
From the Check Detail Report
- Select Banking from the Reports menu at the top, then Check Detail.
- (Optional) Sort the vendors by transaction type and name (check).
- Find the check & double-click on it to commit it to memory.
From the Vendor center
- Select Vendors at the top, then Vendor Center.
- Choose Checks under the “Transactions” tab.
- Find the check and click twice on it to commit it to memory.
If you have not yet created the check
- To write a check, hit banking at the top and press Ctrl+W.
- Every time, fill out the check in the way you want it to appear.
- Select “Save & Close.”
Checking of memory
- Press Ctrl+M in the check window or click Memories.
- Choose the “Reminder” option.
- The “How Often” column lets you choose how often to check (monthly, weekly, daily, etc.).
- In the “Next Date” field, pick the day of the following payment.
- The “Number Remaining” option lets you specify how many payments you would like the program to process.
- Enter the number of days in advance in the “Days In Advance To Enter” area to have the program record the transaction / remind you to enter. Choose 0 to get it displayed on the chosen day.
- Click OK to commit the transaction to a memory. You should then be taken back to the “Write Checks” window.
- If the check is auto-pay, Print Later must be unchecked.
Note: If the check is marked to be printed later, it will appear in the QuickBooks check Printing queue from the day it is recorded.
- Change the check number to Auto payment / Epay (optional) to enable auto-pay.
- Select “Save & Close.”
Read More: Fix QuickBooks Error 1303 | Installer Insufficient Privilege
Printing of the check register
- Select Use Register from the Edit menu.
- After choosing the account from the menu option, click OK.
- Click the Print icon at the top of the register.
- Select the range of dates you want to publish.
- Select OK, then select Print.
Note: To print the split details, select the box next to the option to print the split details.
To write checks without accessing their information, create a user role
Before users can write checks, QuickBooks requires granting them access to a bank account. When using QB Desktop Enterprise, you must create a bank sub-account to keep essential or private transactions, such as payroll, from being seen by a user in the bank register. By doing this, you can limit which of your bank accounts a particular user can access or use to write checks.
Creating a sub-account
- From the Lists menu, choose the Chart of Accounts.
- Right-tap anywhere in the Chart of Accounts box and select New.
- After selecting Bank as the Account type, click Continue.
- In the Account Name field, type A/P Bill Register or any other name that distinguishes it from different bank accounts.
- Check the Subaccount box after choosing the account from which money will be taken out for transactions.
- Select “Save & Close.”
Creating a role for a user
- Consider logging in as a QuickBooks Administrator.
- To configure users and roles, select Users from the Company menu.
- Select the “role list” tab.
- Create a new role or duplicate an existing one with the same degree of access the user needs.
- Adjust the position:
i.) Next to Banking, click the + sign.
ii.) Give full permission to create checks.
- While still in the banking area, choose the + sign before the bank registers.
- A plus sign (+) will be next to the primary checking account.
- After creating the sub-account, highlight it and grant access to view and print.
- Continue modifying the position to grant access to new duties as required.
- Select Set Up Users & Passwords from the Company menu, then select Set Up Users.
- In the User List box, you may change the permissions assigned to a current user or add a new user to allow them the required access.
- To allow a new user to write checks:
i.) Next, from the User List window, select Add User.
ii.) Enter the new user’s password and login information in the Set up user password window. Then click Next to open the window and access the Banking & Credit Cards page.
iii.) Click Finish once you’ve selected Complete Access.
Common issues and the unexpected results
Here below are some issues:
The check number is always the same
Even if you have previously saved a check with a different number, the check number stays the same when you write a new check. The following check number being stored there affects the Check Number Queue. Hence, it needs to be fixed. Try the following solutions to repair the issue:
- Fix any data that has been corrupted in your company file.
- Write the check again. If the number is still incorrect, save the check with the correct number.
Missing Class Field from to write check or check register window
You cannot add class information when you access the Write Checks window or check register. Checks and deposits have no source classes. You can add target classes using the Splits button in the lower-left corner of the check register window.
If the Class field, Restore, and Record buttons are not there when you open the register, close the window & reopen it while holding down the Shift key. Ensure your font DPI and screen resolution are set to the proper values so QuickBooks shows correctly if this doesn’t resolve the issue.
- Check to see if class tracking is enabled.
- From the Edit menu, select Preferences.
- Select the accounting option.
- Select the Company Preferences tab.
- Check the box to use class tracking.
- To close the Preferences window, click OK.
- Tap the Splits button in the lower left corner of the Register after opening the image to split it.
- Adding a class as a choice will be made possible by this.
- If you’re not using the recommended Windows default font:
Set Windows’ display settings to the smaller, 100% default setting.
- In QuickBooks, go to Banking and choose to Write Checks (or Vendors, then Enter Bills).
- Ensure the Items & Expenses tabs have tiny columns in a blank transaction.
- Select “Save & Close.”
- Return to Medium, or 125%, in the Windows display settings.
- QuickBooks’ check & bill entry form columns need to be resized as needed.
Conclusion
Thus, you now understand how to create & print checks on Mac, QuickBooks Online, and QuickBooks Desktop. Just make sure you complete the above procedures in the correct order. Simply follow the instructions as directed, regardless of the version of QuickBooks you are using.
Thus, we hope you can answer all of your queries if you successfully follow the methods for QuickBooks check printing that we have also attempted to explain in this article.
However, don’t hesitate to contact us for assistance or direction. Our QuickBooks desktop support team of professionals is available to answer your doubts and concerns.