Tired of manually entering duplicate transactions over and over in QuickBooks? Imagine having your recurring expenses, invoices, or deposits automatically queued up, saving time and ensuring accuracy. Memorized Transactions in QuickBooks are a hidden gem designed to simplify your bookkeeping process. Whether it’s a monthly subscription, payroll, or rent, QuickBooks can do the heavy lifting by remembering these transactions for you. The ability to create, edit, and export such transactions is available in both QuickBooks Desktop and Online. Let’s explore how this feature can transform your workflow and keep your books error-free while giving you back precious minutes in your day! This article will guide you on editing, deleting, and creating the memorized transactions in Windows and Mac. Let’s get started.
What are Memorized Transactions in QuickBooks?
In QuickBooks, memorized transactions are a handy tool designed to save time and reduce repetitive work. They allow you to store the details of a transaction that occurs regularly, like monthly rent, utility bills, or recurring customer invoices. Instead of entering the same information repeatedly, you can “memorize” it and set it to repeat automatically at specific intervals, such as daily, weekly, or monthly. This not only ensures consistency but also minimizes the risk of forgetting payments or making QuickBooks error codes. Memorized transactions are like having a helpful assistant who remembers your routine tasks, so you don’t have to.
Creating Memorized Transactions
You can create a memorized transaction in QuickBooks online to desktop version as well. Whether you use Windows or Mac operating systems, be sure to take into account the following points in advance.

- Make sure you set Next Date Select to an upcoming date, as it schedules dates automatically.
- In the Number Remaining column, make sure to put the Next Date Transaction.
- If you want to add important details to the transaction, do so and click Ok.
- Once you have completed your Memorized Transaction, always click Save & Next or Save & Close.
- If you plan to use the transaction details later, select the Clear option and then exit the window.
Keeping these points in mind will help you make the workflow smooth. The techniques given further will guide you on how to enter memorized transactions in QuickBooks desktop.
Technique 1: Creating Memorized Transactions for Windows
For Windows, the steps for generating memorized transactions in QuickBooks Desktop are listed further:
- Open QuickBooks Desktop.
- Go to Homepage and click the List dropdown menu.
- Click Memorized Transactions.
- Enter the transaction and do not save it.
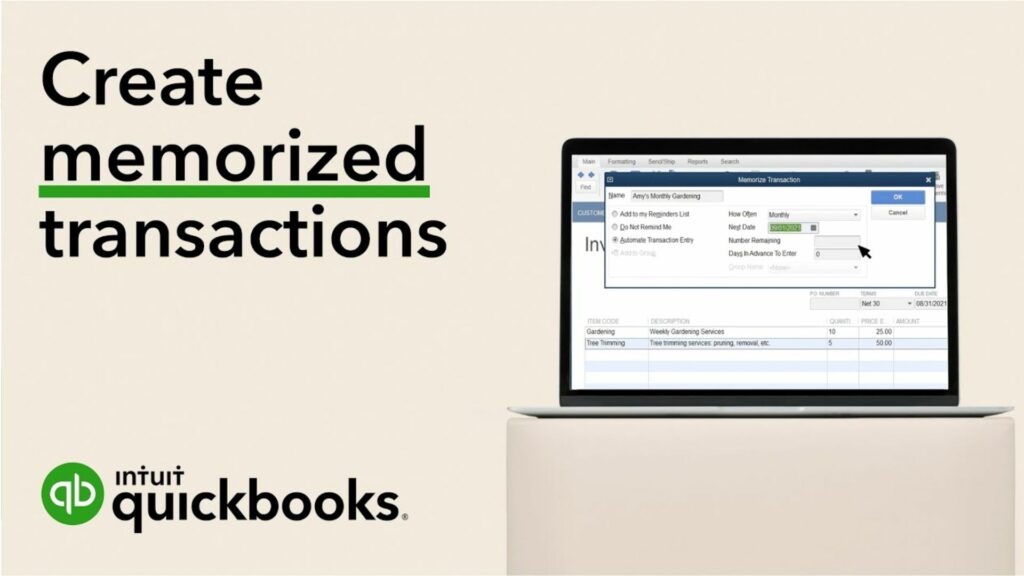
- Click on the Edit menu and then click Memorize.
- Name it and then select any option to handle the transaction.
- Give information as asked and click OK.
- Click Save & Close or Save & Next.
Technique 2: Creating Memorized Transaction for Mac
For Mac, the steps for generating memorized transactions in QuickBooks Desktop are listed below:
- Download Open QuickBooks Desktop.
- Go to Homepage and create or open the transaction you wish to memorize.
- Click on the Edit menu, then click Memorize.
- Name the transaction and select whether you want QuickBooks to set a reminder or automate the transaction entry according to your preferences.
- Then select How Often do you want the transaction to be repeated.
- Select the Next Date for the transaction to happen.
- Put the transaction frequency in the Number Remaining field to tell QuickBooks how many times you want the transaction.
- In the Days in Advance To Enter field, type the days you want QuickBooks to start reminding you before the transaction occurs.
- Click OK.
- Click Save & Close or Save & Next.
Technique 3: Creating Memorized Transaction for QuickBooks Online

The procedures for creating memorized transactions differ if you use the online edition of QuickBooks instead of the desktop version. Here’s how:
- Make sure you have reliable internet connectivity first.
- Run QuickBooks Online after that, and select the Gear Icon.
- Click on the Recurring-Transactions tab.
- Next, choose the transaction type and click New.
- Next, select Ok and provide a Template Name.
- Additionally, choose Unscheduled, Scheduled, or Reminder by clicking Type.
- Lastly, click Save Template after entering the remaining data.
Ensure the data and values you submitted are accurate when generating the memorized transaction.
Memorized Transaction Group
In QuickBooks, a group of transactions with the same due date that are grouped is called a memorized transaction group. A group’s transactions will all execute simultaneously and in the same manner. To assist you in remembering your transactions, you may establish a transaction group if they have similar due date. Do the following:
- First, select the Lists menu bar.
- Click Memorized Transaction List after that.
- Scroll down and choose Memorized-Transaction.
- Select New Group now, then enter the group name, frequency, etc.
- To construct a transaction group that has been memorized, click Ok at the end.
Adding a Transaction to a Group
- Generate a transaction you wish to memorize and click Memorize.
- Select Add to the Group and also pick the Group Name.
- Click OK.
Read More: QuickBooks Auto Data Recovery Tool
Adding an already memorized transaction to a group

- Pick the Group Name and choose Add to Group.
- Click OK.
Using a Memorized Transaction
- Go to Lists menu and choose Memorized Transactions.
- Select the transaction memorized.
- Next, choose Settings, and last, click Use.
- Make the necessary adjustments after that, and then choose Save.
- Choose Memorized Transactions from the Lists menu.
- Choose Edit Memorized Transaction from the Edit menu.
- Edit the transaction details here and then click Save.
- Choose Delete Memorized Transaction if you wish to remove the transaction.
Memorizing reports issues
QuickBooks won’t be able to save the report if the user encounters an error notice while attempting to create a memorized report. It can be because the report’s description is overly detailed. To lower the size of your report in this situation, try reducing the number of channels or the precise amounts of items utilized in each channel. If you select the Process Multiplier Reports option from the Reports menu bar but the report does not appear, a faulty report or a report from a different version of QuickBooks may be the cause. In these cases, you must locate the problematic report, delete it, and then create it again.
Editing Memorized Transactions
If you have a transaction saved in QuickBooks Enterprise on a Mac or Windows computer, change it. You probably wonder, “How do I edit memorized transactions in QuickBooks Desktop?” Well, you need not worry because this article has a step-by-step guide.
Technique 1: Editing Memorized Transactions for Windows
Now, let’s learn how to edit memorized transactions in QuickBooks desktop. For Windows, the steps for editing memorized transactions in QuickBooks Desktop are given further:
- Run QuickBooks Desktop.
- Click on the Lists menu bar.
- Double-click on the transaction you wish to edit.
- Make changes to the transaction as you desire.
- Select Memorize from the top.
- To update the transaction, click on Replace.
- Click Add to create a new transaction.
- Click Save & Next or Save & Close.
Technique 2: Editing Memorized Transactions for Mac
For Mac, the steps to edit memorized transactions in QuickBooks Desktop are given below:
- Run QuickBooks Desktop.
- Click on the Lists menu bar.
- Click on Memorized Transactions.
- Go to Edit and click on Edit Memorized Transaction.
- Edit a memorized transaction and click Save.
Deleting Memorized Transactions
On both Mac and Windows versions of QuickBooks Desktop, the Lists menu bar allows you to manually remove transactions that have been memorized. This menu is helpful because it offers a variety of options, including the ability to remove transactions that have been memorized. We advise you to select the appropriate transaction to remove when doing so. Let’s now examine how to remove QuickBooks transactions stored in your QuickBooks Desktop for various operating systems.
Technique 1: Deleting Memorized Transactions for Windows

Now, let’s learn how to delete memorized transactions in QuickBooks. For Windows, the steps for deleting memorized transactions in QuickBooks Desktop are given further:
- Run QuickBooks Desktop.
- Click on the Lists menu.
- Select Memorized Transaction List.
- Click on the transaction that you wish to delete.
- Right-click Memorized Transaction.
- Click Delete Memorized Transaction.
- Click Ok to delete.
Technique 2: Deleting Memorized Transactions for Mac
For Mac, the steps to delete memorized transactions in QuickBooks Desktop are given below:
- Launch QuickBooks Desktop.
- Locate and select the Lists menu.
- Click on Memorized Transactions.
- Go to Edit menu and click it.
- Click Delete Memorized Transaction.
Exporting Memorized Transactions

To use your lists of memorized transactions however you wish, it’s simple to export them from QuickBooks. Here’s how:
- Log into QuickBooks.
- Go to dashboard and click on Reports.
- Click on Lists and then click on Memorized Transactions Listing.
- Create a new spreadsheet by selecting the Excel option.
- Export the transaction you have memorized.
You can export the sheet to any necessary software once it is ready. It could take some time to complete the export of QuickBooks Memorized Transactions.
Conclusion
Now that the post has ended, we hope you, as a reader, will find it helpful. If you need help with the above approaches or assistance, contact our team of QuickBooks technical support specialists and pros by calling our toll-free number, +1(844)-214-9614.
Frequently Asked Questions
Q1. How do I see a list of memorized transactions in QuickBooks?
To see a list of memorized transactions in QuickBooks, you can:
- Go to Lists menu
- Select Memorized Transaction List
Q2. What do memorized transactions mean in QuickBooks?
In QuickBooks, “memorized transactions” refer to pre-configured transaction templates that you can set up to automatically repeat on a schedule (like weekly, monthly, or yearly), essentially saving time by eliminating the need to manually enter the same details for recurring bills, invoices, or checks every time they occur; they act as a way to automate repetitive data entry in your accounting software.
Q3. Which transaction Cannot be memorized in QuickBooks?
The following transaction types cannot be memorized in QuickBooks:
- Payroll checks
- Time records
- Bill payments
- Sales tax payments
- Sales tax receipts
- Deposits of payments
Q4. Does QuickBooks automatically record transactions?
Yes, QuickBooks can automatically record some transactions, including:
- Bank deposits
- Fees and deposits
- Recurring transactions
Q5. What are excluded transactions in QuickBooks?
Excluded transactions in QuickBooks are transactions that are removed from account registers and financial reports. They are not added to QuickBooks or downloaded again.

