
QuickBooks financial software is well known for managing the financial tasks of businesses. But does that mean it is error-free? No. Recently users have started complaining about QuickBooks Printer Not Activated Error Code 20. This error prevails while upgrading or installing Windows. This error blocks you from printing a document using QuickBooks software.
In order to help you to avoid this issue, we have come up with this informative post. In this post, we will discuss various aspects of QuickBooks Printer Not Activated Error Code 20 that one should know. So without any further delay, let’s get to know more about QuickBooks error code -20.
QuickBooks Printer Not Activated (Error Code 20): Overview
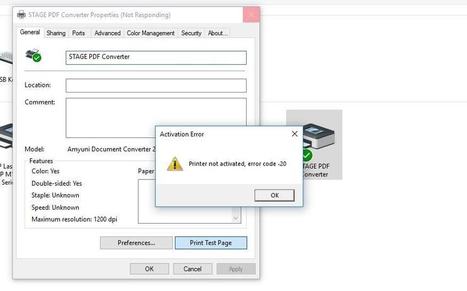
This error code 20 QuickBooks is one of the most common QuickBooks error codes that prevail when users are trying to install or update a new Windows version. It generally happens when you delete a Software key. It will display an error message “Could not print to a printer. Check your printer selection. Printing may have been canceled from another program”.
Causes for QuickBooks Printer Not Activated Error Code 20
There can be multiple causes for printer not activated error code -20 QuickBooks. So now let’s have a look at the reasons below:
- Incomplete or damaged installation of QBs software.
- The issue with your registry files.
- QBs version is not appropriate for the Windows you are using.
- Your PDF converter is not properly set up.
- The application key is not updated to the latest release.
- You are using invalid printer drivers.
Points to Read Before Fixing QuickBooks Error Code 20 Printer Not Activated
Just look at the points that you should consider before looking for solutions for printer error code 20 QuickBooks. So, here we are mentioning them:
- Try to install a 32-bit version of Windows in case you are using Windows Vista/XP.
- Ensure that you are not using an outdated version of QBs.
- If you are using two versions of QBs then make sure that both versions have different installation files.
- Update your QuickBooks software and Windows drivers.
- Log in as an Administrator on Windows.
Easy Solutions to Repair QuickBooks Printer Not Activated Error Code 20
This error could frustrate you but it can be fixed using the most proven solutions mentioned in this post. Let’s get started:
Solution 1: Give Control Access to Windows Registry
By giving full access to users to access the registry file so that they can make modifications that are needed. To fix this issue, you need to do this:
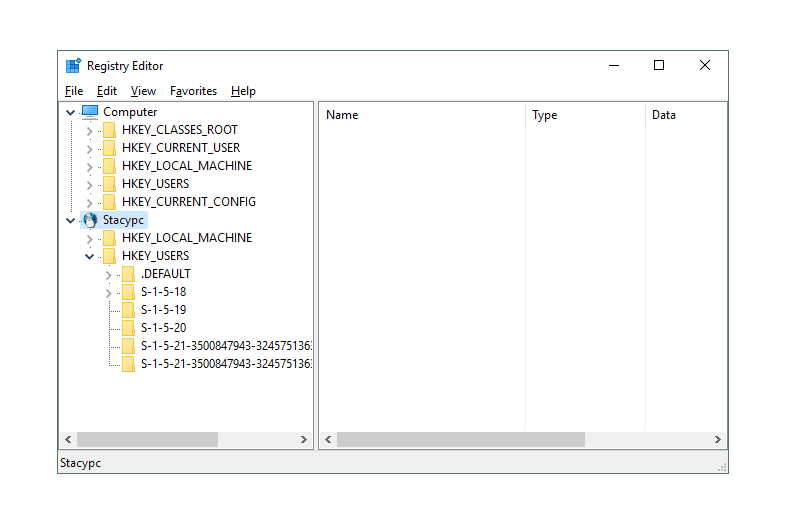
- Hold Windows + R, it will open a Run box.
- Write Regedit there and choose Run as Administrator.
- Look for HKEY_CURRENT_CONFIG to open the registry editor.
- Select the permission by right-tapping on the folder name of the software.
- Verify that you have full/complete access control.
Solution 2: Activate “Printer Spooler Service”
The printer spooler service manages the paper printing jobs sent to printers and print servers from a computer. So, for resolving QuickBooks Printer Not Activated Error Code 20 you need to activate it by looking at the steps below:
- Enter MSC in the Run Box by pressing Window + R.
- Then tap on Print Spooler Service from the list.
- Choose Properties and end Print Spooler Service.
- Now, click on Automatic from Startup Type.
- Lastly, press Print Spooler and select Start.
Solution 3: Use QuickBooks Print Repair Tool
In order to fix issues related to printing you can use the QBs print repair tool. After using this, you will get out of this error as follows:
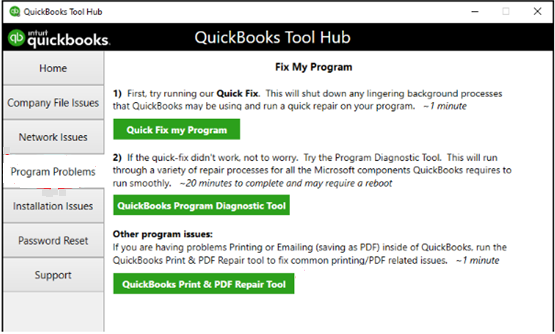
- After downloading QBs Print Repair tool.
- Try to run it in Administrator mode.
- This application will begin to run with a red background.
- Now check if your printer is printing from QuickBooks only.
- After that, you will receive a prompt to restart the system.
- At last, verify that all apps are closed while you are running the tool.
Solution 4: Disable User Account Control
UAC protects your system from any malware or virus attack. But to resolve QuickBooks Printer Not Activated Error Code 20 you need to disable it. Just follow these instructions:

- Type Control Panel in the run.
- Tap on User Accounts and choose Change UAC Settings.
- Then hit the cursor on Never to Notify.
- Press OK and restart the system.
Solution 5: Remove qbprint.qbp and wpr.ini Files from QuickBooks
These two files might create problems in printing. In order to avoid you need to remove them from QBs. Hers are the steps that you need to follow for removing:
- Firstly, open Windows File Manager and go to path C:\ProgramData \Intuit \QuickBooks.
- Then delete qbprint.qbp & wpr.ini files.
- Lastly, delete files from the C:\Users \All Users \Intuit \QuickBooks folder.
Solution 6: Reinstalling QBs using Clean Install
These errors can be resolved by uninstalling QuickBooks desktop for Windows, renaming the company files, then reinstalling the program using the QuickBooks Clean install. The steps are:
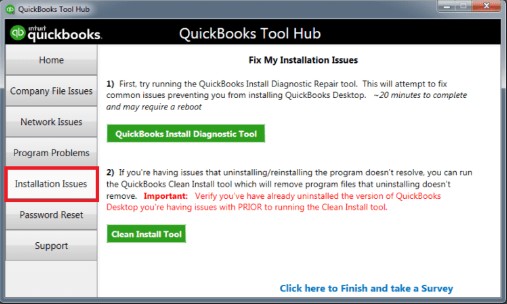
- First of all, download QuickBooks Tool Hub.
- Start downloading QBs Clean Install from the Intuit website.
- After that, Save it anywhere (We would recommend a Desktop)
- Now, hit “Yes” when prompted.
- In the next step, you must approve the “License agreement.”
- After that, pick up your software along with the product version.
- Press Continue and hit OK.
Solution 7: Repair Microsoft Document Writer

Microsoft document writer is an in-built QuickBooks component that saves your information in PDF format. You need to repair it by following these actions:
- Firstly, open the QuickBooks icon and choose Open File Location.
- After that, visit Temp Folder.
- Then, you need to locate and open the .exe File.
- Now conclude the installation process.
- After that, again go to QuickBooks to register for the license number.
- In case, if you face any trouble while installing the ABS PDF driver, try to install it again.
- At last, print again and see if the error is fixed or not.
Solution 8: Allowing the Use of PowerShell Script

To allow the usage of a PowerShell script to fix the QuickBooks Printer Not Activated Error Code 20, you can follow these steps:
- Open Notepad or any text editor.
- Create a new PowerShell script and paste the following one-liner:
(Get-WmiObject -Query “SELECT * FROM Win32_Printer WHERE Name=’YourPrinterName'”).SetDefaultPrinter(); if ((Get-Service -Name spooler).Status -ne ‘Running’) { Start-Service -Name spooler } else { Restart-Service -Name spooler }
- Replace ‘YourPrinterName’ with the name of your printer.
- Save the file with a .ps1 extension, such as “FixPrinter.ps1“.
- Open PowerShell with administrative privileges.
- Navigate to the location where you saved the PowerShell script using the cd command.
- Execute the script by running the following command: .\FixPrinter.ps1.
Also, if you want to fix any error that require using QB tools, then download QB tool hub & then run any tool like QuickBooks file doctor & many other ones.
Conclusion
In this article, we told you about the reasons and solutions for QuickBooks error code 20. You might feel frightened while dealing with QuickBooks Printer Not Activated Error Code 20. But with the help of our informative post, you can easily fix it like a genius. The solutions mentioned here are not only easy to perform but also give you assurance. If you know the exact reason for this error then you can use the appropriate solution, otherwise, you can try all the solutions one by one to fix this issue. If you come across any problem then you can contact our professionals 24*7.