
Suppose you are trying to print an invoice, you click on the print option, and nothing happens. We have watched businesses wasting hours with manual troubleshooting of printing problems, and we know how frustrating these interruptions are.
QuickBooks is relying on a number of Microsoft components in order to print and create PDFs, such as the XPS Document Writer, MSXML, and the Print Spooler service. Any disruptions in these components can block the printing system. As a result, you will not be able to print invoices, save invoices in PDF, or perform simple accounting activities that your business relies on daily.
The QuickBooks PDF and Print Repair tool is useful in solving printing problems without any manual troubleshooting. In this guide, we will explain how you may download and run this tool to resume QuickBooks printing again.
What Is the QuickBooks Print and PDF Repair Tool?
QuickBooks Print and PDF Repair Tool is a free diagnostic tool created by Intuit. It automatically identifies and fixes printing-related errors in QuickBooks Desktop. When you run this tool, it checks your system to find the damaged Microsoft components required by QuickBooks to print and fixes them. This tool can handle complex Windows component repairs that most users can’t troubleshoot manually. The Tool works by examining every component in the printing chain, from QuickBooks internal print functions to Windows system services to your actual printer drivers. When the problem appears, it automatically reinstalls the damaged drivers, repairs corrupted system files, and resets printer configuration. You can download the Print and PDF Repair Tool either through the QuickBooks Tool Hub or directly from Intuit’s website as a standalone download. This program is incredibly effective at fixing many QuickBooks printing problems and PDF issues.
Configurations of the QuickBooks PDF repair tool
Some of the configuration of this tool is given as follows:
- Version- Latest updated version
- Developer- Intuit
- Language- English
- Downloads- 19M
- License- Both free and chargeable
- Size- 23 MB
What Are the Causes of Printing Errors in QuickBooks?
Understanding the reasons behind the printing errors can help you to implement the right solution. Common causes of this issue include:

- Damaged or Corrupted XPS Document Writer: QuickBooks relies on the Microsoft XPS Writer to generate PDF files. The absence, malfunction, or corruption of this aspect can block QuickBooks from creating PDFs.
- Unsupported Printer Drivers: QuickBooks will not support a printer if it’s incompatible or has outdated printer drivers.
- Print Spooler Service Not Working: The print spooler service handles all the print jobs on Windows. QuickBooks is unable to process commands once it stops running or becomes unresponsive.
- Damaged MSXML Component: MSXML assists in QuickBooks processing structured data. QuickBooks can not process printing when MSXML is corrupt or not installed properly.
- Restricted User permissions: A Windows user account with limited permissions may fail to open printer components or system folders in QuickBooks.
- Limitations of the Systems Resources: Printing errors can also be caused by low RAM or old versions of Windows.
Common Error Fixed by QuickBooks Print and PDF Repair Tool
QuickBooks PDF Repair Tool is designed to fix common printing and PDF-related issues that can interrupt your daily accounting work. Below are some of the common errors it can resolve:
- QuickBooks Errors 1722 and 1801 can appear while using the PDF converter.
- The printer is not responding, and QuickBooks freezes during the print or email process.
- Unable to save invoices, forms, or reports in PDF format.
- A 32-bit application is unable to print properly.
- Activation issues with QuickBooks PDF Converter.
- Software stops working during account reconciliation.
- You receive an Error message: “The device is not ready” while printing.
- Missing PDF component error.
How to Get and Run the QuickBooks Print & PDF Repair Tool?
Accessing the QuickBooks Print and PDF Repair Tool is simple; however, the thing that you need to understand is from where and how you can download it. There are two official and safe methods available:
- Method 1: Access the Tool from QuickBooks Tool Hub.
- Method 2: Download the standalone tool from the Intuit Website.
Both of these methods are reliable. The steps are given below:
Method 1: Access the Tool from QuickBooks Tool Hub
In this method, you first need to download and install the QuickBooks Tool Hub, then proceed with the steps given below:
- Ensure your QuickBooks application is closed.
- Double-click on the QuickBooks Tool Hub.
- Click on the Program Problems.
- Select QuickBooks Print & Repair Tool
- The tool will work automatically for resolving errors.
- Once the Tool completes its process, open QuickBooks again to attempt print, email, or save the PDF.
Method 2: Download the Standalone Print & PDF Repair Tool
This method allows you to download the repair tool directly without installing the Tool Hub. Follow the steps which are given below:
- Open the official Intuit support page and search for QuickBooks Print & PDF Repair Tool.
- Download the file named “QuickBooksDesktopPDFTool.exe”.
- Save it in your Downloads folder.
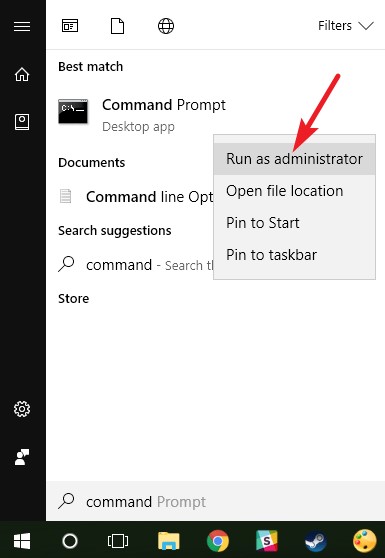
- Locate the downloaded file and right-click on it, and select Run as Administrator.
- The command window will open next.
- It will automatically repair printer drivers and PDF components.
- Once finished, you need to restart your system.
Procedure to fix the QuickBooks PDF and print issues with QuickBooks Desktop
There are several ways to address the QuickBooks Print and PDF error. As a result, we shall examine each approach individually. Now, let’s get started:
Things to keep in mind
It’s essential to look at a few guidelines that must be considered before choosing one of the key solutions. Let’s investigate those points:
- It is imperative that the user first confirm that the printer has been turned on correctly.
- The user can then verify if the printer can print from another program. If everything functions as it should, QuickBooks may not be the issue.
- The user should also attempt to restart the computer’s system to fix the issue.
- In addition to the printer error pop-up, the user may encounter a QuickBooks or Windows error dialogue.
Method 1: Reinstall, alter permissions, and test for the XPS document writer
Before starting this process, the user must consider a few essential factors. If you’re wondering what those points are, we’ve listed them below for your convenience:
- Intuit does not administer any of these technologies and does not support Microsoft programs.
- To prevent any mess, the user is advised to seek an IT specialist to complete these chores if they are uncomfortable doing so.
The process now begins:
Step 1: Printing documents outside of QuickBooks is the first step in testing the XPS document writer
- Initially, the user must choose the “Print” option from the “File menu.”

- Next, select the “Microsoft XPS Document Writer” from the print window’s printer list.

- Save the “.xps file” now.
- Finally, locate the .xps file on the desktop:

- Some circumstances may arise, such as when the user did not experience an error when saving the file and the file is not present. The user may be unable to print to the XPS Document Writer because of a security configuration.
- This requires the user to open the .xps file if it exists. If the file does not appear correctly or the user experiences any issues opening it, the user must reinstall XPS Document Writer.
- Finally, it is necessary to reinstall QuickBooks Desktop if an issue arises when the user attempts to print.
The second phase, which consists of steps A and B, is now available.
Read More: Fix QuickBooks Error 1303 | Installer Insufficient PrivilegeStep 2: Microsoft XPS Document Writer Reinstallation
- Part A: In this section, the user must “Verify” whether or not the XPS Services are enabled.
- Part B: The user should reinstall the XPS Document Writer in Part B.
Let’s explore each stage individually.
Part A: The user can confirm whether or not the XPS services are enabled
- To launch the Windows Explorer, hit the “E key” and tap the “Windows key.”
- Select the “Computer tab” located in the upper-left corner of the screen
- Under the System group, select uninstall or switch out an application.
- The user must now choose whether to turn on or off the “Turn Windows Features” button on the left.

- Finally, confirm that XPS Viewer and XPS Services are turned on.
Part B: XPS Document Writer Reinstallation for Windows 8 & Windows 7/Windows Vista
Regarding Windows Vista and 7:
- Selecting the “Devices and Printer” options from the “Windows Start” menu is the first step for the user.
- Next, choose the “MS XPS Document Writer tab” and “Remove device.”
- Hit the option “Yes” to confirm and proceed.
- Pick the “Add a printer” & “Add a local printer” options from the toolbar.
- Next, select the “Use an existing port” option.
- Additionally, select “XPSPort: (Local Port)” and press “Next.”
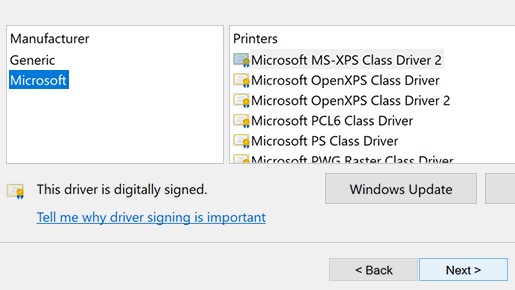
- The user must select “Microsoft” and “Microsoft XPS Document Writer v4” from the manufacturer list.
- Next, press the “Next” button.
- The last step is to select the “Replace the current driver” option and tap the “Next” button.
For Windows 8:
- The “Start Screen” must initially be displayed by hovering the mouse pointer over the lower or upper right-hand corner.
- Selecting “Settings> Control Panel > Devices & Printers” is our next step.
- Next, pick the “Microsoft XPS Document Writer” icon and select “Remove device.”
- To confirm, the user must now choose the “YES” option.
- Select “Add a printer” from the toolbar and “Add a local printer or network print” with the manual settings option.
- Using an existing port option, the next step is to choose the “PORTPROMPT” or local port.
- To proceed, tap the “Next” option.
- After selecting “Microsoft,” the user must select “Microsoft XPS Document Writer v4” from the manufacturer list.
- Tap the “Next” option once more.
- After choosing the “Replace the current driver” option, press “Next.”
- The name is “Microsoft XPS Document Writer” once the v4 is removed from the Printer Name field.
- Pressing the “finish” tab is the last step, after which you can proceed.
Step 3: The user must modify the XPS Document Writer’s screen window user permissions
If a Windows user lacks the authorisation to print to the XPS document writer, the QuickBooks software wouldn’t be able to generate the .xps file. The user must also be signed in with administrator privileges to modify these rights.
- Opening the “Printers Control Panel in Windows” is the first step.
- Afterwards, right-click “Microsoft XPS Document Writer” and choose “Printer properties (Windows 7 & 8) / Properties (Windows Vista)”.
- Press the “Security” button now.
- Select the “Everyone user group” option.
- This step is optional. The user can do the following steps if the Everyone group is not shown in the list:
- Pressing the “Add button.“
- Type the word “Everyone” into the field, and finally
- Tap “Check Names” and press “OK.“
- To proceed, the user must choose “Print” and press the “OK” tab in the Allow column.
- The user must now open Windows Explorer and proceed to “C:\Windows\System32\spool.”
- The user must select “Properties” after selecting “Printers” in this stage.
- Next, select the “Security” tab.
- Select the “Edit” option now.
- Go ahead and select the “Add” option.
- After typing “Local Service,” press “Enter.
- After confirming that Local Service has “Full Control,” click “OK.”
- Download QuickBooks, then attempt to “create a.pdf file.”
Step 4: The user must modify the security software options
Occasionally, security software settings like Norton Antivirus / McAfee Firewall can also prevent the generation of. XPS files. To ensure the. XPS files aren’t prohibited; users must check those settings on their security program.
Step 5: MSXML 6.0 Installation or Repair
MSXML 6.0 is a component of Microsoft Windows and is included in the XPS Doc Writer’s system requirements. There may be differences between the instructions for Windows 7 and Windows 8. Let’s examine each step individually:
Regarding Windows 8:
- Windows 8 includes the system file checker, a tool Microsoft offers to fix Windows system files. Therefore, the user must launch it.
- Click on the “magnifying glass” after hovering the mouse pointer in the upper / lower right-hand corner.
- To proceed to the next stage, the user must input “Command” and select the “Command prompt.”
- Select the “Run as Administrator” option from the bottom bar.
- Simply type the password or select “Allow” if the user is asked for the admin password.
- Finally, enter “sfc/scannow.”
Regarding Windows Vista and 7:
The user must also utilize the built-in System file checking in Windows 7 to fix MSXML 6.0.
- The first step is for the user to click the “Windows Start” button.
- Then choose “All Programs” and then “Accessories,” respectively.
- Now choose both “Command Prompt” and “Run as Administrator.”
- If the user is asked for the “Admin password” in this instance, just type it in or select “Allow.”

- Type “sfc/scannow” as the final step.
Read More: How To Download, Install & Run QuickBooks Refresher ToolStep 6: The user must draft a new form template before proceeding
The user may experience this problem if the template for their form is damaged. The user must, therefore, make a new template for their form in these situations.
- Making a new form template is the first step.
- Change the transaction template after that.
- Finally, produce the.pdf file.
Step 7: Avoiding the print spooler is the final step
It’s time to configure the XPS document writer to prevent the print spooler from happening after the user has finished the previous stages.
- The first step is for the user to launch Windows’ “Printer Control Panel.”

- After that, right-click “Microsoft XPS Document Writer” and choose “Printer Properties or Properties,” depending on the user’s Windows model.

- After choosing the “Advanced tab” option, select “Print Directly to Printer.”

- To save the adjustments and exit the “Printer Properties,” press “OK” as the final step.
Method 3: Removing or renaming the printer file
The user can remove the damaged files while creating new ones if the solutions mentioned above are ineffective. The following are the steps in this process:
- The user must first look for and locate the files.

- After that, attempt to rename the files to “qbprint.old” and “wpr.old” rather than remove them.
- Launching QuickBooks and opening the company file is the subsequent phase in the procedure.
- After completing that, the user must choose a file and click Printer Setup.
- The user must select any transaction from the Form Name & click OK.
Method 4: Make sure the reconcile window is off to fix the issue
The reconcile window may be off-screen if you experience a problem where QuickBooks stops working after you choose the reconcile option, whereas the PDF function is running. To deal with this:
- Select the “Banking” menu.
- Check to see if the reconcile panel stays off-screen after being selected.
- Navigate to the “Window” menu.
- To see if the reconciliation window is mentioned, look through the list.
- Choose “Close All” to end all open windows.
- Try the reconciliation process again.
- Make sure the screen displays the reconciliation window.
- Try restarting QuickBooks if the issue continues.
Method 5: Troubleshoot QuickBooks print to PDF freezes and restore the backup
Restoring a backup can be a good way to deal with QuickBooks’ “Print to PDF” feature freezing. Take these actions:
- To be ready for the repair procedure, close QuickBooks.
- Find the most current backup file for QuickBooks.
- Verify again that there is no corruption in the backup file.
- Open QuickBooks again, then select the “File” menu.
- Select your backup file and click “Restore Backup.”
- To finish the restoration, adhere to the on-screen directions.
- Once restored, attempt to reuse the “Print to PDF” function.
- If the function blanks, update your QuickBooks program to the most recent version for better compatibility and performance.
- For the changes to take effect, restart your system after the update.
- To verify that the problem has been fixed, launch QuickBooks and check the “Print to PDF” feature.
By following these comprehensive instructions, you can successfully handle and fix particular problems with QuickBooks’ reconciling window visibility & “Print to PDF” feature.
Read More: Steps To Enter Or Edit QuickBooks Payroll Service KeyTips Before Running the PDF Repair Tool
Before you start troubleshooting printing problems with the PDF Repair Tool, it is important to consider the precautionary steps. These small checks can prevent data loss and ensure the tool works seamlessly.
- Close QuickBooks Desktop: Make sure that no company file is open and QuickBooks processes are running in the background.
- Restart Your Computer: Restart your computer before starting the repair process. This will assist in clearing temporary glitches and stopping unnecessary background services.
- Create a Backup of Your Company File: Although the tool doesn’t affect the accounting data, keeping a backup ensures your financial information remains safe.
- Update Windows: Verify that your Windows is updated and your system meets the minimum requirements.
- Disable Antivirus or Firewall Software: Temporarily disable antivirus or firewall software if you suspect it is blocking printer services. Enable it again after completing troubleshooting.
Some additional methods to fix QuickBooks inability to create PDF issues
Here are more methods for resolving QuickBooks ‘ inability to create PDF issues:
Method 1: Clear or reset the print spooler or printing queue
Follow these steps to use this method in Windows and Mac:
In Windows
- Click the Windows icon, then type services into the search bar. If the services app appears, click it.
- Double-click the print spooler in the list of services that appears after selecting the standards tab.
- Click OK after pressing the stop button.

- Press the Windows symbol on your keyboard and occasionally close this window.
- Type “%WINDIR%\system32\spool\printers” into the search bar, then choose “%WINDIR%\system32\spool\PRINTERS” from the list that appears.
- Then, remove every file visible within this folder.
- Repeat steps 1 and 2 and press the start button. In the startup type box, choose automated and then click OK.
In Mac

- After choosing System Preferences from the Apple menu, tap on Print & Scan. Then, select your printer from the list of printers and click “open print queue.”
- If the printer is paused, restart it. The printing queue might have automatically jammed if you have any printing or printer problems. From the print queue, select the resume button.
- To remove outdated print jobs, look for stuck ones and click the X next to the progress bar.
Method 2: Check for printer software updates
You may always check the driver updates for Windows from the control panel’s device manager area. The same applies to Macs; you may choose Software Update from the Apple menu. Reinstalling the operating system may help you resolve this issue if your drivers function correctly or don’t require upgrades.
If you continue to receive the QuickBooks PDF error with Windows 11, the last resort is to run QuickBooks PDF repair tool.
How to Prevent QuickBooks Printing Errors?
Prevention helps in early detection and reduces the recurrence of the issue. Based on the queries that we have handled, these measures can work effectively to avoid printing errors:
- Update your Windows operating system regularly.
- Make sure the QuickBooks Desktop is updated to the latest release.
- Verify that your Microsoft XPS Document Writer is enabled.
- Ensure that your printer drivers are always updated.
- Do not try to force-close QuickBooks while printing.
- Add QuickBooks to the antivirus exception list.
- Create a regular backup of your company file.
Taking these small measures to maintain a seamless printing process in QuickBooks.
When Should You Seek Professional Help for QuickBooks Printing Errors?
While you can resolve many printing issues by using the PDF Repair Tool or basic troubleshooting methods. If these fixes do not work or the issues keep returning, it may indicate deeper technical problems. Consider consulting experts when:
- QuickBooks frequently crashes during printing.
- The Print & PDF Repair Tool fails to resolve the issue.
- You have reinstalled the printer drivers, but the issues continue.
- Multiple workstations in your organisation are facing the same issues.
- PDF converter activation errors persist.
In such a situation, experts can diagnose the system-level conflicts and provide a long-term resolution.
Conclusion
Read the full article if you have trouble printing your documents from the QuickBooks application. We have covered every step in detail, including detailed explanations of all the procedures. If followed correctly, this will make fixing the associated errors a breeze.
In addition, a detailed description of how to use and download the QuickBooks PDF repair tool has been provided. However, if you continue to experience problems, you may contact the QuickBooks desktop support team of professionals immediately, and they will give you all the help and direction you need.