QuickBooks is an ultimate accounting application developed to ease accounting and book-keeping activities. This software is designed by Intuit for every small and medium-sized company worldwide. A QB user can perform multiple tasks related to book-keeping on QuickBooks such as managing inventories, creating invoices, creating payroll, paying bills, tracking cash flows, and much more. Like other software, sometimes QuickBooks also faces some glitches and errors because of some technical fault. Many QB users may face some errors that damage the data file or lose the entire data of the QB company file which leads to a big loss to the entire business operation.
QuickBooks Auto Data Recovery tool helps the users to come out of this situation. This single tool can recover all the damaged data of the company file. Basically, the Auto Data recovery QuickBooks is a tool that restores the backup of the company file, and when QuickBooks faces this type of circumstance to lose data or damage data, it allows the QB user to recover the backup of the company to the QuickBooks for smooth operation.
In this post, we are going to discuss the QuickBooks Auto Data Recovery files. To know more about this tool, you are required to read this post to the end.
What is QuickBooks Auto Data Recovery File?
The QuickBooks Auto Data Recovery file is a very crucial file for QuickBooks accounting software. This file ultimately saves the backup of all the company data that harm the entire operation of the company if it gets damaged or lost. This tool actually puts to use the current Transaction Log File and a copy of the company file to restore the lost transaction. This file restores all the transactions of the company file except the last one. The QuickBooks Auto Data Recovery uses the current transaction log file and the copy of the company file to restore the lost transaction.
The user can recover the lost data through Auto data recovery QuickBooks in two ways:
- Recreating the lost transaction with the current transaction log file and a copy of the company file.
- Recreating the last few hours of transactions with a copy of the company file and the transaction log file.
Things To Remember Before Using QuickBooks 2012 Auto Data Recovery
These are some important facts the user needs to keep in mind before opting for QuickBooks 2012 auto data recovery.
- The QuickBooks Auto Data Recovery File is only available for Pro, Premier, and Enterprise Windows users.
- This file is not featured in Accountant Editions.
- This file only works, when the system is updated to its latest release.
- If the backup data is larger than 1.5 Gigabytes (GB) then you are unable to create an ADR file, because it has a limitation of storage of 1.5 GB.
How to Restore QuickBooks Auto Data Recovery?
There are several ways to use or restore QuickBooks Auto Data Recovery to restore the backup of the company file in a situation of damaged or lost data.
Recover Lost Data from Original .TLG files with .QBW.adr File
- First, you should create a new folder on the desktop under the name QBTest
- After that, go to the folder where the company file is saved.
- You can also opt for the product information screen and No company Open Windows to track the path for the company file.
- Now inside the company file folder, the user has to copy the file with Corresponding.tlg and paste it to the newly created folder QBTest on the desktop.
Show File Extensions:
- To show the file extension, the user has to press the Windows + E keys together on the keyboard to open File Explorer.
- Now the user is required to click on the Organize option and then choose the Folder and search option.
- For Windows 10, 8.1, & 8- the user has to choose the View option and then select the filename extension.
- After that, select the Hide Extension for know files type Option

- And then click on the apply button and then hit the OK
- Now, open the QuickBooks Auto Data Recovery folder which is saved in the same location where the company file is located on the system.
- Now, from here, the user has to copy the .QBW.adr file and paste it to the newly created folder QBTest on the desktop.
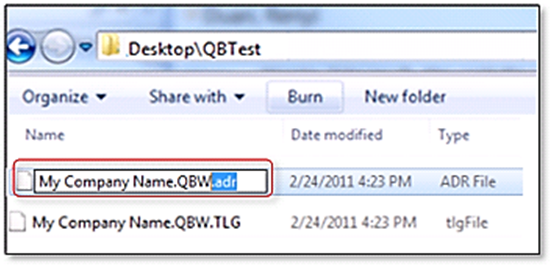
- Now go to the desktop, open the QBTest folder and right-click on the .QBW.adr file and select the Rename option
- The user has to erase the .adr extension from .QBW.adr file.
- Now go to QuickBooks and open it.
- After that, open the company file that is saved on the QB test folder. Use the account register to verify all transactions are there.
- Now, to ensure the integrity of the company the user has to Run the verified utility.
- If the company file is fine enough, then the user can move the Damaged Company file to distinct the location.
- At last, the user can move a copy to the Original location from the QB Test folder.
Also Find- How to fix QuickBooks Error 6210?Recover Latest Transaction Data through .QBW.adr and .TLG.adr Files
In the second method to restore the data, we will use both .QBW and .TLG file. Read the below point to apply this method.
Note:- In this method of QuickBooks Auto Data Recovery can take up to 12 hours to recover the lost or damaged data on the system.
- The very first step is to create a New Folder under the Name QBTest on the desktop.
- After that, open the QuickBooks Auto data recovery through the QuickBooks company file feature. You can also navigate to the product information screen by pressing the F2 Key + I key together to check the location of the company file.
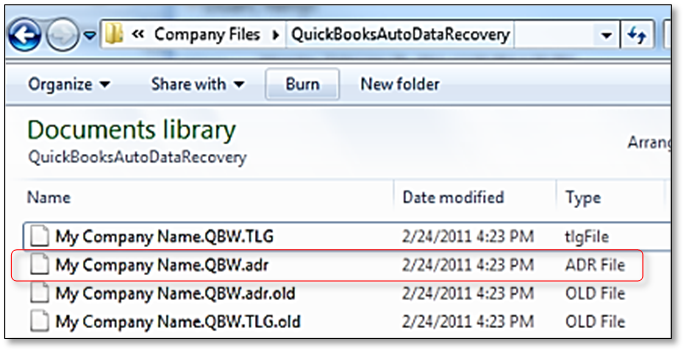
- Inside the auto data recovery QuickBooks, the user is required to access the .TLG.adr and ADR files copy both files and paste them into the QBTest folder on the desktop.
Show File Extension
- To show the file extension, the user has to press the Windows + E keys together on the keyboard to open File Explorer.
- Now the user is required to click on the Organise option and then choose the Folder and search option.
- For Windows 10, 8.1, & 8- the user has to choose the View option and then select the filename extension.
- After that, select the Hide Extension for know files type Option
- And then click on the apply button and then hit the OK
- Now, open the QuickBooks Auto Data Recovery folder which is saved in the same location where the company file is located on the system.
- Now, from here, the user has to copy the .QBW.adr file and paste it to the newly created folder QBTest on the desktop.
- Now go to the desktop, open the QBTest folder and right-click on the .QBW.adr file and select the Rename option
- The user has to erase the .adr extension from .QBW.adr file.
- Now go to QuickBooks and open it.
- After that, open the company file that is saved in the QBtest folder. Use the account register to verify all transactions are there.
- Now, to ensure the integrity of the company the user has to Run the verified utility.
- If the company file is fine enough, then the user can move the Damaged Company file to distinct the location.
- At last, the user can move a copy to the Original location from the QBTest folder.
Conclusion
Hopefully, this post was worth reading to you. By reading this article you get all the information about QuickBooks Auto Data Recovery Files. This post covers the two main topics what is an ADR file and how to use it or how can a user restore the damaged or lost data file through an ADR file?
QuickBooks 2012 auto data recovery is an efficient device that helps the user when QuickBooks company file data is damaged or lost. The ADR file is a tool that creates and saves the backup of the QuickBooks company file. In this particular post, we also covered the steps to use the QB ADR file and restore the data from it in two different ways.
If you have any doubt about the above steps or felt any confusion in applying the process to restore the data file then contact QuickBooks customer support experts. They are appointed to assist you in a bad state while working on QuickBooks. You can contact them on a toll-free number from anywhere in the world. They are 24X7 available which means they are no bounty of time limit to reach them. Feel free to contact them and seek help from them in a precise manner.