Many users across the world have reported about QuickBooks error H202. It is the most common yet agitated issue. Not only does it restrict you from accessing the software in a multi-user environment but brings other nuisances as well. The error appears with text that states “QuickBooks company file is located on a different computer and QuickBooks requires some help connecting.” The QuickBooks Error H202 occurs when your workstation is not able to communicate with the server that stores the company files. Some common causes for this error include firewall issues, damaged setup files, incorrect hosting settings, and network issues.
This error indicates that the software is unable to access a QB file due to the blocking of a multi-user server. You can easily troubleshoot the issue with the solutions provided below. However, if you want then download and install QuickBooks file doctor for quick troubleshooting.
What is QuickBooks Error H202?

QuickBooks Errors H202 is a common problem in multi-user mode, which appears when the workstation is unable to connect to the server on which the company file is located. As soon as the problem arises, QuickBooks sends users an error message stating, “This company file is on another computer, and QuickBooks needs some help connecting”. Such notifications mean that QuickBooks Desktop is unable to communicate with the hosting computer. The usual causes of issue includes poor network connection, firewall blocks, or incorrect server settings. Due to this connection failure, users will not be able to access company files in multi-user mode.
Major Causes of QuickBooks Error Code H202
While dealing with user queries, our team has identified the main reasons that trigger Error H202, which is the failure to establish communication between the workstation and the server. However, some factors trigger the issues, these include:
- QuickBooks Services are Not Running: When services like QuickBooksDBXX or QBCFMonitorService stop working or fail to start automatically. As a result, the workstation fails to access the company file in multiuser mode.
- Firewall Blocking QuickBooks Connection: Windows Firewall or third-party security programs sometimes block essential QuickBooks ports. When these ports are restricted, your workstation fails to connect with hosting company file.
- Incorrect Hosting Configuration: Hosting must only be enabled on the server computer. If the hosting is enabled in multiple systems, it creates conflicts that lead to QuickBooks Error H202.
- Damaged Network Data (.ND) File: The.The ND file stores network configuration details that assist QuickBooks in locating the company file. If this file becomes damaged or corrupted, QuickBooks fails to identify the correct file location.
- Improper DNS or Network Settings: Incorrect DNS configuration or unstable network connectivity prevent the workstation from identifying the server address, resulting in communication failure.
Symptoms to Identify QuickBooks Error H202
Before troubleshooting the issue, we recommend that users check for certain warning signs and symptoms that indicate QuickBooks Error H202. Recognising these symptoms early will help you to identify the problem quickly and apply the correct fixes.
- Error Messages Appear on Screen: One of the most noticeable signs of Error H202 is the pop-up messages. When this error hits your system, you get an error message stating “The company file is on another computer, and QuickBooks needs some help in connecting”.
- Failure to Switch to Multi-User Mode: When users attempt to switch QuickBooks to a multi-user mode, the system may display Error H202 instead of allowing access to the shared file.
- Slow System or QuickBooks Performance: Network connectivity issues often cause QuickBooks or Windows to respond slowly while connecting with the server.
- Company File Can’t Be Accessed: Users may experience difficulty opening the company file stored on another system within the network.
- System Freezing or Screen Blackouts: In some cases, the system may freeze or turn black while QuickBooks tries to communicate with the hosting server.
Top Solutions to fix QuickBooks Error H202
These solutions help you to resolve the error right away. Not only we have mentioned the use of QuickBooks File Doctor but other solutions as well. Make sure to conduct the steps as suggested and eradicate this issue.
Solution 1: Ping Server from a Workstation
We recommend using the Ping command to check whether the workstation can communicate with the server over the network. When the ping test fails, it confirms a network error. Running this test helps to quickly determine whether a network communication problem causes the error.
Enable Network Discovery on Server
- Open the server and workstation.
- Then, just access the Windows Start menu.
- Thereafter, open the Search field and enter Network there.
- Make sure to access the Network and Sharing Centre.
- Consequently, click on Change advanced sharing settings.
- Pick Turn on the Network discovery button.
Get Server Name
- Initially, access the Windows Start menu.
- Get into the search field and enter the Run tab.
- Access the Run command.
- Subsequently, enter CMD there.
- Hit Enter.
- Open the CMD window and enter ipconfig/all.
- Again, hit Enter.
- Try to search for the Host Name inside the Windows IP Configuration window.
- Try to locate the server name on the right side of your screen.
- Just note down the hostname.
- Copy the same to a Word document.
Examine Network Connectivity
The user can examine the network connectivity on the workstation with the help of these steps:
- Access the Run window.
- Specify CMD inside the search bar.
- Try to ping the server now.
- Subsequently, enter the ping_server name.
- Click Enter.
- Conduct the steps as suggested above on every system.
- If there are some issues within the network, then try to resolve them.
Solution 2: Add Server to the Windows Host File
We add the server’s IP address and hostname to the Windows Hosts file to ensure that the workstation can recognise the server correctly. This method helps to resolve DNS or name-resolution issues that prevent QuickBooks from locating the hosting computer.
- Close all the Running Program in your workstation.
- Navigate to C:\Windows\System32\Drivers\Etc.
- Tap twice on the Hosts file and open it with Notepad.
- Type your server’s IP address and computer name in the designated box.
- Save the file and restart your desktop.
- Lastly, open QuickBooks and switch to multi-user mode to check if the issue is fixed.
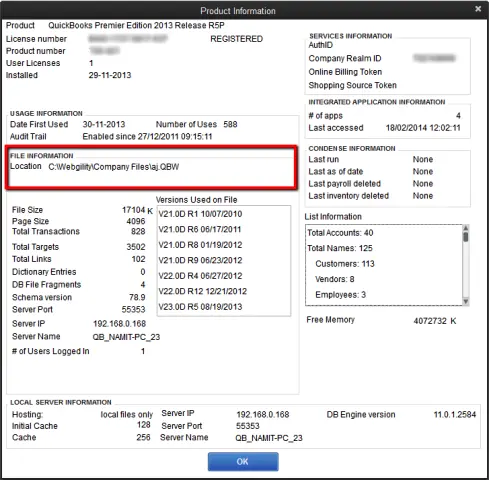
Solution 3: Set Hosting to Local Files
Our team checks the hosting configuration because enabling hosting on multiple workstations often causes conflicts. Enabling hosting on the server and disabling it on workstations eliminates unnecessary communication conflicts.
- Open QuickBooks on your workstation.
- Press F2 to open the Product information window.
- Under the Local Server Information, set Hosting to Local File Only.
- Ensure that hosting is enabled only on the server system.
This step prevents multiple computers from attempting to host the same company file at the same time.
Solution 4: Run QuickBooks File Doctor
We often suggest users run QuickBooks File Doctor as it is designed to identify and fix company file and network problems automatically. Once you run it, this tool analyses both the QuickBooks data file and network settings as a way of solving connectivity issues that lead to the error H202.

- To initiate, go to the official download page of the tool hub.
- You can find it on the Intuit website.
- Thereafter, try to download and install the QuickBooks tool hub.
- After completing this process, open the tool hub.
- Consequently, choose the Company File button.
- Then, hit Run QuickBooks, file doctor.
- Get into the drop-down menu.
- Pick your company file from there.
- If you cannot detect the file, then click the Browse option.
- Later, select the Check file damage only box.
- Tap Continue.
- Further, you need to specify the QuickBooks admin password.
- Choose Next.
Just ensure that the time for scanning mainly depends on your file size and internet speed. If it is taking more than 5 minutes, then these two factors are responsible.
Solution 5: QuickBooks Database Server Manager
Users can utilise QuickBooks Database Server Manager to rescan the folder that stores the company file. The process assists in updating the network setup and makes sure the server is sharing the QuickBooks file with the other workstations properly.
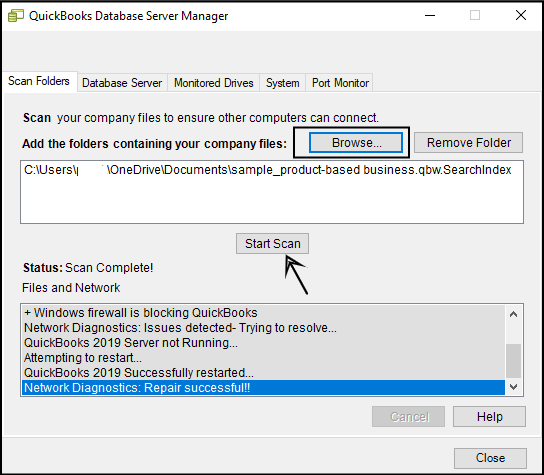
- To begin with, access the Windows Start menu.
- Go to the search field and type the database name there.
- Moreover, you need to choose the QuickBooks database server manager.
- Find out the folder where you have stored the QB files.
- Tap the Browse button to find it.
- Thereafter, click Start Scan.
- Try to resolve the settings within the QBDBSM.
- Pick Close when the whole scanning procedure ends.
- Later, you need to access the software on each workstation.
- Then, visit the File menu.
- Pick the Switch to multi-user mode button.
- The error will disappear if you are having no issues while using multi-user mode.
Solution 6: Run QuickBooks Install Diagnostic Tool
In some instances, QuickBooks installation files get corrupted. In such a case, you can use the QuickBooks Install Diagnostic Tool to fix the installation and correct the problems connected with Microsoft elements used by QuickBooks.
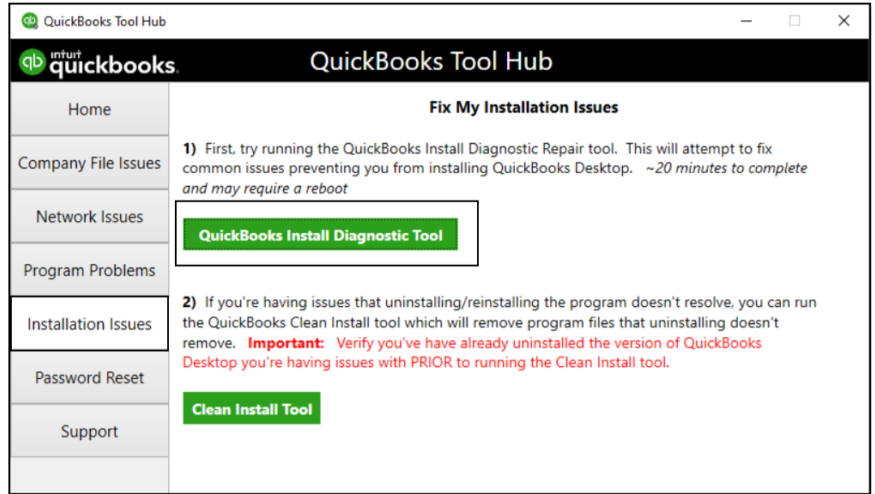
- Open the tool hub.
- Pick the Installation Issues button.
- Thereafter, choose the QuickBooks Install Diagnostic Tool button.
- Try to conduct the scanning of the QB folder.
- Make sure that you note down the IP addresses and network interfaces.
- Also, enable the ports if the firewall has an Open port.
- Navigate towards testing the data file connectivity and click on the same.
- Just access the QB data file.
- Finally, check if you have resolved this error or not.
Solution 7: Rename.TLG and .ND File

The.TLG and ND files assist QuickBooks in managing network connections and transaction logs. When these files become corrupted, QuickBooks fails to access the company file. Renaming them allows QuickBooks to recreate fresh files automatically.
- Just close your QuickBooks.
- Open the server and access the QB folder.
- Try to locate the .tlg file.
- Then, perform a right-click on the tlg file.
- Hit the Rename button.
- Modify the prefix by adding old there.
- Consequently, hit Enter.
- Do the same procedure for the nd file too.
- After that, these files will be created on their own.
- Thereafter, access the QB file.
- Hit the Alt key continuously till you open the file.
- The error would be resolved thereafter.
Solution 8: New Folder for QuickBooks
Sometimes, creating a new folder on the server to relocate the company file resolves the error. This assists in fixing folder access or permission-related issues that prevent QuickBooks from sharing the file in a multi-user environment.

- Go to the server.
- Try to create a new folder there.
- After that, you need to modify the permissions for QB files and a new folder.
- Make sure that you copy the .qbw file to a new folder.
- Hit the Ctrl + C buttons to do so.
- Also, check if the multi-user mode is working or not.
Solution 9: Check QuickBooks Services
Check whether QuickBooksDBXX and QBCFMonitorServices are running properly. When these services are misconfigured, QuickBooks can’t communicate with the hosting server.
- To initiate, access the QuickBooks software on the server.

- Choose File and pick Utilities.
- Then, you need to click on the Host multi-user access.

Try to examine the running status of these two services, QBCFMonitorService and QuickBooksDBXX, with the steps below:
- Access the Run window.

- Enter services.msc in the search field.
- Hit the OK button.
- After that, you need to click on QuickBooksDBXX.
- Set the Startup type to Automatic.
- Hover your mouse towards the Service status.

- Choose Running beside it.
- Click the Recovery button.
- Further, pick Restart the service from the drop-down of first, second, and subsequent failures.

- Choose the Apply and OK buttons.
- Try to do the same procedure for QBCFMonitorService.
Solution 10: Firewall Configuration

Firewalls can block QuickBooks communication ports required for multi-user connectivity. By configuring firewall rules and opening the required QuickBooks ports, you can enable the workstations and server to communicate freely.
- Open the system firewall.
- Try to make exceptions there.
- After that, make the changes within the firewall.
- Open QuickBooks on every computer.
- Pick the File menu.
- Consequently, tap Switch to multi-user mode.
Solution 11: Add QuickBooksDBXX and QBCFMoitorService to the Admin Group
In some cases, permission restrictions prevent QuickBooks services from functioning properly. By adding QuickBooksDBXX and QBCFMonitorService to the administrator group, we ensure they have the required access to manage network connections.
- Open the Control Panel from the server system.
- Visit the Administrative Tools, then open Computer Management.
- Select Local Users and Groups⇢Groups.
- Open the Administrator group.
- Add QuickBooksDBXX and QBCFMoitorService to that list.
- Save the changes and restart both services.
Allowing admin access ensures that permission restrictions do not interrupt server communication.
Solution 12: Run QuickBooks Connection Diagnostic Tool
You can use the QuickBooks Connection Diagnostic Tool to detect network and firewall issues that block company file access. Running these tools helps in identifying connectivity errors and offers detailed network diagnostics.
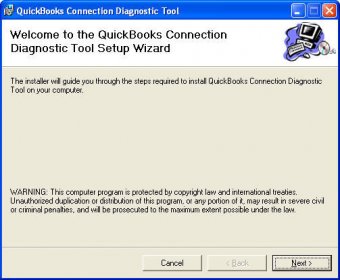
- Try to first download and install the tool.
- Now, you need to scan the QB folder.
- Once done, just note down the IP address that appears when you run the QuickBooks connection diagnostic tool.
- After that, try to configure the firewall ports.
- Go through the instructions carefully.
- Just accessing the company files on the computer brings an H202 error.
Solution 13: Access Windows Control Panel
When QuickBooks program files get damaged, the software may fail to connect with the server. Using the Repair option in Windows Control Panel allows us to fix damaged installation files and restore proper program functionality.
- First of all, close QuickBooks on every system.
- Access the Windows Control Panel.
- Thereafter, you need to click on the Programs and Features button.
- Pick QuickBooks and also choose the Change and Repair option.
- Consequently, try to provide positive options for QB software repair.
- Update your software with the newest release.
- Finally, open your QB file to see if an error has been resolved or not.
Solution 14: Modify the Company File Location
Sometimes moving QuickBooks company files to a new folder or location can resolve the H202 Error issue. Changing the file location resolves network access and permission issues.
- Open Drive C: on your computer.
- Make a new folder there.
- The folder will be used to store the QB file.
- After that, click on the company file folder.
- Thereafter, choose the Company file and the respective.TLG file.
- Hit the Ctrl + C buttons.
- Once done, move towards the QB file folder.
- Consequently, choose Paste.
- Also, examine if you can work smoothly with multiple users or not.
Solution 15: Edit the QBGlobalAppConfig.ini File on the Fedora Linux Server
When QuickBooks is hosted on a Linux-based server, incorrect port configuration can interrupt communication between the server and the workstations. Edit the QBGlobalAppConfig.ini file to the correct port setting and restart the services.
- Open the Linux terminal.
- Locate the QBGlobalAppConfig.ini File and open it.
- From the default port range, any spaces before or after the equal sign (=).
- Select an appropriate port range from the Install Linux Database Server Manager.
- Save the file and restart QBDBFILEMON and QBDBMGRN services.
This establishes effective communication between QuickBooks and the Linux server.
Solution 16: Repair and Update QuickBooks
Sometimes, the QuickBooks H202 occurs due to damaged program files or outdated software versions. You can fix it by updating the software from the Windows Control Panel. This ensures all the program components function correctly.
- Access the Control Panel button.
- Navigate towards the Programs and Features button.
- Tap Programs.
- Search for QuickBooks on the list of all programs.
- Consequently, perform a right-click on the same.
- Hit Uninstall/Change button.
- Click Repair.
- Moreover, choose Next.
- The screen brings you some instructions that you need to follow.
- After that, update the software to its newest release.
- Access QuickBooks.
- Tap the Help menu.
- Subsequently, select Update QuickBooks.
- Get all the updates in right away.
- Once done, just restart your system and use the software.
How to Prevent QuickBooks Error H202?
Prevention is an effective and trustworthy method of avoiding mistakes and ensuring smooth business operation. With the correct settings and frequent monitoring, you will be able to avoid the likelihood of this error in the future to a great extent.
- Hosting Only on the Server: We always suggest that users allow web hosting access only on the server computer and not on all working computers. This assists in avoiding any forms of conflict between hosting.
- Keep QuickBooks Upgraded: The latest QuickBooks updates include bug fixes and enhance the compatibility of a multi-user environment.
- Watch QuickBooks Services: QuickBooksDBXX and QBCFMonitorService have to always be on the server.
- Properly Configure Firewall: Open necessary QuickBooks ports by setting up your Windows Firewall in such a way that the workstation and the server can easily communicate.
- Network Consistency: A strong network connection will also maintain constant availability to common company files.
When Should You Seek Professional Help for QuickBooks Error H202?
In many cases, the professional troubleshooting steps can resolve Error H202 more quickly than trying different methods. Also, there are situations where deeper technical issues require assistance from professionals. We recommend that users seek expert assistance in the following situations:
- Persistent Error After Troubleshooting: If the Error H202 still appears after you try the troubleshooting methods. The problem may involve deeper network configuration issues.
- Server or Network Complexity: Businesses use dedicated servers and a complex network environment that requires professional configuration.
- QuickBooks Services Keep Stopping: If QuickBooksDBXX or QBCFMonitorService repeatedly stop running, it may indicate server or permission issues.
- Company File Access Issues Across Systems: When multiple workstations fail to access the company file, expert diagnosis can quickly identify the root cause.
Conclusion
Everyone who has previously been unable to handle this error now, after reading this article, will understand how QuickBooks error h202 occurs and what actions should be taken to prevent it from happening again. We have created a comprehensive post that will provide you with a thorough explanation of QuickBooks error h202. As we have attempted to explain why it occurs, along with easy solutions, one can efficiently resolve this issue from their system by carefully following all the instructions.
Therefore, we hope this blog will answer all your questions, but if you still need help, don’t hesitate to contact us; our team of professionals is available to help and answer any questions you may have.