
If you are installing or updating QuickBooks, then getting this QuickBooks error 1712 is quite common. Interruptions due to the Windows registry and other damaging programs can halt the installation procedure. So, it is advisable to go through the guide for learning each way to troubleshoot this issue.
The error brings trouble to the QuickBooks software. Moreover, users cannot tackle any tasks through it. They might end up with the consequent appearance of the error texts. So, what should you do to tackle this issue? Well, we are here with the answer. Get into the post below to learn how you should resolve the error. You are provided all the solutions on the expert’s advice
What is QuickBooks Error 1712?

The error text that appears with this issue goes like “We’re sorry! Something went wrong with your installation.” Moreover, it can impact the system’s performance. This installation issue can become bigger if not resolved in a minimal time. So, make sure to try out the solutions as soon as possible.
There have been lots of factors responsible for this issue. You must get into the post below to learn them.
Factors that Cause QuickBooks Error 1712
From our troubleshooting experience, Error 1712 often indicates underlying issues with Windows configuration, damaged installation, and system conflicts. Understanding the exact cause is essential to apply the right solutions. Here are some frequent causes of Error 1712:
- Damaged Windows Installer Files: When the core Windows installer files are corrupted, QuickBooks can’t complete the installation process, causing Error 1712.
- Registry Conflicts: Incorrect registry entries often interfere with the new installation.
- Incomplete Previous Installation: If an older version of was not completely removed from your system, its remaining files and folders may clash with the new installation.
- Insufficient Admin Rights: Without proper administrative permissions, QuickBooks can’t access or modify the required system files for installation.
- Corrupted .NET Framework or MSXML Components: QuickBooks depends on these Windows components to run its installer. If they are outdated or damaged, it causes error 1712.
- Pending Windows Update: Missing system updates can leave compatibility gaps, which create conflicts with QuickBooks installation requirements, leading to this error.
Also Read: How To Update QuickBooks (Get Latest Tools and FeatureSymptoms to Identify QuickBooks Error 1712
Before Error 1712 hits your system, it shows some early signs. Understanding these symptoms will allow you to take early prevention measures. Based on our experience, these are some common signs of Error 1712:
- Installation Failure Message Pop-up: During installation, a warning message appears on your computer screen stating “Error 1712: One or more files required to restore your computer to its previous state could not be found”.
- QuickBooks Crashes Mid-Installation: The installation process starts normally, but suddenly freezes before completing, leaving QuickBooks partially installed.
- Blue Screen Errors: In some cases, the system becomes destabilised, and Windows crashes displaing a blue screen error.
- Unresponsive Programs: Other applications on your system also start freezing alongside the QuickBooks installation failure, indicating a deeper system conflict.
- Repeated Installation Prompts: QuickBooks keeps asking for a complete installation each time you open it, indicating a faulty setup.
Solutions to Fix QuickBooks Error Code 1712
Lots of solutions can help you to resolve the QuickBooks error 1722. Follow the guide further to know more.
Solution 1: Close the Processes

- First of all, hit Ctrl + Alt + Delete.
- Then, click the Task Manager tab.
- It will bring you a new window of the same name.
- Navigate towards the Processes button.
- Perform a right-click on the QuickBooks process.
- Thereafter, hit End process.
- Now, it is recommended to restart the system to save changes.
Solution 2: Fix Registry Path Issues (App Data)
Incorrect registry paths can prevent QuickBooks from locating the required files it needs for installation. Fixing the App Data path in the registry to provide QuickBooks the right direction. Once corrected, the installation process can proceed without any error.
- From your keyboard, press Ctrl+Shift+Delete.
- A window will appear on your computer screen. Select Task Manager from there.
- Navigate to the Processes tab.
- Select the running QuickBooks software.
- Next, click End (QBW32.exe, QB32.exe, QBDBMgrN.exe).
- Once done, restart your system.
Solution 3: Use QuickBooks Install Diagnostic Tool
- Navigate toward the download link of the QuickBooks tool hub.
- Thereafter, try to download the tool.
- Make sure to install this program on your device by running the QuickBooksToolHub.exe file.
- Also, conduct the steps as shown on your screen.
- Provide acceptance of the terms and conditions for using it.
- After a successful installation, launch the tool hub.
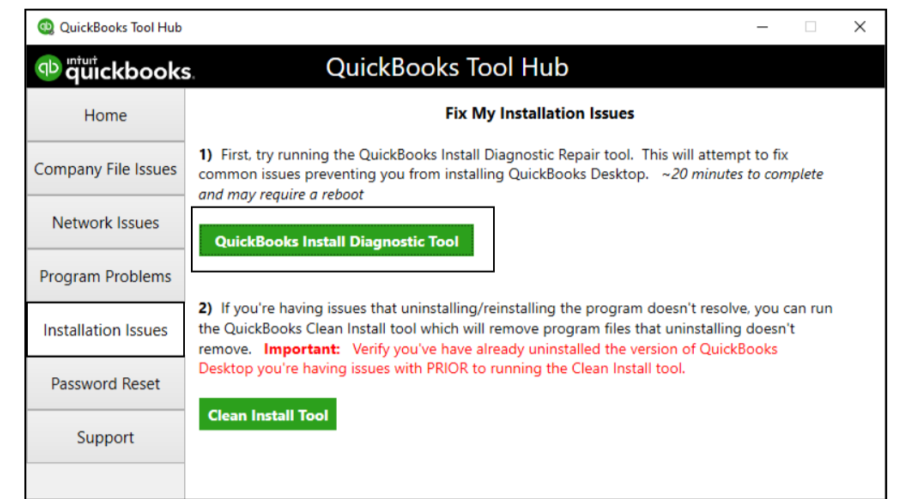
- Now, you need to choose the Installation Issues button.
- Then, choose QuickBooks Install Diagnostic Tool.
- Retry the QuickBooks installation and end this entire process.
Solution 4: QuickBooks Desktop Reinstallation

- Visit the Intuit site.
- Try to download the latest release of QuickBooks.
- Later, choose Change.
- You need to pick the Product edition now.
- Once done, choose the newest release.
- Finally, just click the Download bar.
Solution 5: Run Quick Fix My Program

- Open the QuickBooks tool hub.
- If you don’t know how to download and install the tool hub, then take help from the second solution.
- Thereafter, click the Program Problems button.
- Also, choose Quick Fix my Program.
- The program will run rapidly on your system.
- Once it stopped, just check out the corrupted folder and program.
- Also, restart the system to save all these modifications.
Solution 6: Use the Microsoft Install and Uninstall Troubleshooter
Incorrect registry entries or corrupted files are a surprisingly common cause of Error 1712. We recommend using Microsoft’s official Install and Uninstall Troubleshooter to safely resolve the issues without risking further system damage.
- Visit Microsoft’s official support page and download “Microsoft Program Install and Uninstall Troubleshooter”.
- Then, run the downloaded file.
- Click on the Next button and select the “Installing” option when prompted.
- Select the specific version that you would like to install or uninstall.
- Allow the tool to implement fixes.
- Once it’s done, reboot your system and install QuickBooks again.
Solution 7: Repair Corrupted Windows Components (MSXML & .NET)
To maintain its regular activities, QuickBooks relies on Windows components such as .NET Framework and MSXML to run its installation correctly. When these components are missing or damaged, it results in Error 1712. You can easily address this by manually repairing or re-registering these components, offering a stable environment for installation.
Repair .NET Framework
- Open the Start menu and type “Turn Windows features on or off”.
- Next, search for .NET Framework 4.8 (or the latest version) and .NET Framework 3.5.
- Temporarily disable the components.
- Click OK to restart your computer.
- Follow steps 1 and 2 again.
- Enable the components again after checking the boxes.
- Lastly, click OK and reboot your computer again.
Re-register MSXML Components
- Go to start menu and type cmd.
- Right-click on the Command Prompt and select Run as Administrator.
- Type the following commands and press Enter after each one of them:
- For a 64-bit system:
- cd\windows\syswow64
- regsvr32 MSXML6.dll
- For a 32-bit system:
- regsvr32 MSXML6.dll
- Wait until you receive a confirmation message stating registration succeeded.
- Close the command prompt window and install QuickBooks again.
Solution 8: Modify the Application Data in the Registry
- Click the Start menu.
- Click on the search field.

- Within the search bar, enter regedit.exe.
- After that, you have to search for the path:
HKEY_CURRENT_USERoftwareMicrosoftWindowsCurrentVersionExplorerUser Shell - In order to access the app’s entry information, it is necessary to double-click it.

- Replace the value that was used in the initial step with the local profile route to finish it.
- Then, in the end, will need to restart your computer and then review QuickBooks for any errors.
Solution 9: Add a Windows user with Admin Rights
Within the Windows system, open the Windows Settings.
- Press the Windows + I buttons together to open the settings.
OR - Press the power button located in the Start menu, then click on the Gear icon to open Settings.
- Open the Windows Settings window on your PC
- Click on the Accounts option.
- Select the Additional People or Family option.

- Choose the option to add someone else to the computer.
- It is not necessary to enter your email address if the program asks you to input the email address
- You must click instead because I don’t have this person’s sign-in details
- There will be an option to add a user who does not have a Microsoft account. Click on this option
- Create a new username and password for this user.
- Click Next to continue.
- Create this local account for the administrator.
- After that, click on the Local account you just made on the page for the same settings for your account.
- Select the Change type of account option.
- In this case, you must move the user from Standard to Administrator.
- Click OK and continue
- Start the QuickBooks Desktop program.
- Finally, open the company’s file and verify for the QuickBooks Error 1712.
Also Read: QuickBooks Update Error Codes And Their Resolutions
Solution 10: Ensure Windows is fully updated
An outdated Windows operating system can create compatibility issues, causing Error 1712. Always check for Windows updates before you attempt any QuickBooks installation.
- Go to start menu→click on Windows Settings.
- Select Update and Security.
- Next, click on Check for updates.
- Repair the following:
- .NET Framework 4.8.
- Microsoft Visual C++ 2022 Redistributable
How to Prevent QuickBooks Error 1712?
Preventing QuickBooks Error 1712 saves you from the frustration of failed installations and lost productivity. Follow these simple yet effective measures to keep installation error-free every time:
- Install QuickBooks with Administrative Rights: Running the installation process without admin rights is one of the common reasons why Error 1712 appears. Right-click on the installer to select Run as Administrator.
- Update Windows Periodically: Pending Windows updates often mean missing system components. Before you attempt QuickBooks installation, make sure you update Windows with the latest version available.
- Delete Previous Installations: Delete all the old files and old QuickBooks version as this can create a conflict with the new install. You can utilise the Clean Install Tool from QuickBooks Tool Hub to ensure uninterrupted installation.
- Temporarily Disable Your Security Software: Sometimes, security software mistakenly blocks QuickBooks installation files. Disabling it temporarily during the installation process prevents unnecessary interruptions.
- Store a Safe Backup of the Company File: Before installation, save a backup of the company files to avoid data loss if something goes wrong.
- Do Not Interrupt the Installation: Once the installation process starts, avoid restarting or shutting down your system mid-process.
When Should You Ask for Professional Help?
In most cases, QuickBooks Error 1712 can be resolved easily with the methods which are outlined in this guide. However, there are situations where these standard troubleshooting steps cannot fix the issues. This is when our expert team comes in to help. You can reach experts when:
- Your Windows registry has been significantly damaged, and you are not comfortable making manual edits.
- You face random system crashes, blue screens, or extremely slow system performance.
- Error 1712 keeps appearing even after trying the troubleshooting methods.
- Critical company data becomes inaccessible as a result of failed installation attempts.
If you face such situations, it is wiser to contact a professional than try different troubleshooting.
Conclusion
We conclude this article hoping that you have found what you are looking for. Now, with the mentioned solutions, you will be able to resolve QuickBooks Error 1712. If not, don’t hesitate to contact us for assistance or if you have any additional queries concerning the issue or QuickBooks in general.