QuickBooks Clean Install Tool - Fix QB Errors

At times, QuickBooks installation brings some bugs with it. The user receives lots of disturbance due thereafter. Not only do they end up with the corrupted installation of QuickBooks but also face sudden shutdown and hangs. Keeping this essential point, Intuit designs yet another powerful tool known as QuickBooks Clean Install Tool.
The tool operates a clean installation of QuickBooks and fixes all the glitches and malicious activities that come along with the installation. QuickBooks removal tool download aids the user in every way to fix issues. The tool turns out to be a necessity for QuickBooks proper functioning. Installing QuickBooks with this tool fixes all kinds of issues instantly. The tool provides a quick method to rescue your system and data.
Every QuickBooks user should consider its use whenever the software gets trapped due to some malicious components. This tool is also helpful for reinstalling the software. So, if you witness some hindrances while running QuickBooks then make sure to reinstall the software by learning how the tool functions to fix bugs.
What is QuickBooks Clean Install Tool?
QuickBooks Clean Install Tool automatically renames and rectifies the existing install folders of QuickBooks. That in turn, gives space to new files within the software. These files constitute the installation procedure in a clean way without disturbing the company data.
The tool relieves the user in so many ways while rectifying all kinds of installation errors like QuickBooks error 1625 and others with the same series. There are lots of instances where you can use this tool on the device. Such as:
- When the software brings any kinds of installation errors.
- Still getting the same issue even after conducting several attempts.
- When you could not fix the issue with simple reinstallation.
- During the occurrence of an error when you open several company files on the network.
If you are experiencing any of these glitches then make sure to run the tool on your device. You will be guided all the way on how to conduct the clean installation of QuickBooks.
Things to Consider before using the QuickBooks clean install tool
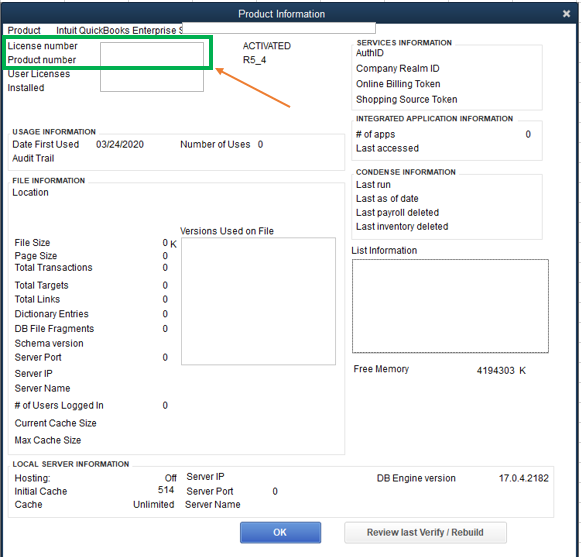
- The user needs to keep in mind that the QuickBooks Desktop download file, license numbers, and installation CD are available. Also, try to have the product and license number by pressing F2 and pressing Ctrl + 1 from the keyboard. So you do not need to trouble yourself with anything required to log in to the system after reinstallation.

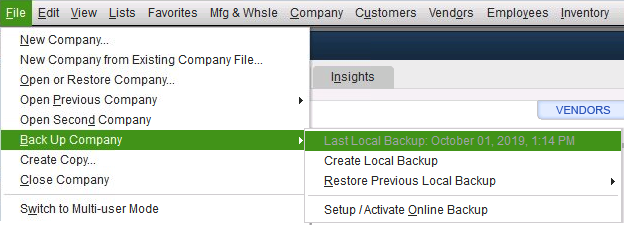
- Now, try to create a backup of the company file to remove every chance that can lose the data stored in the system.

- The second step you can do by inserting a flash drive in the system for the backup. The user can create the backup from either of the two given below methods.
- The first is to create the backup of the company files for the open QuickBooks.
- Go to the file and select the backup company option which will help in creating a local backup.
- According to your preference, select local backup or online backup. Although, it is safer to save the file on the flash drive because of its quick way to transfer.
- Hit the next tab and move on to the onscreen instructions to finish the task of creating the backup of the data.
When to Use Clean Install Tool QuickBooks?
If the user is experiencing any of the following issues while using QuickBooks then he/she can ease the working functionality with the use of the Clean Install Tool QuickBooks.
- After performing multiple attempts of reinstallation, the system still shows the same installation error.
- At the time when the re-install of QuickBooks cannot resolve the error issue that disturbs the ongoing process frequently pops up.
- During the period when the user on the network tries to access more than one company file simultaneously.
How to Download and Install QuickBooks Clean Install Tool?

- First, you need to download the tool from the Official Website of Intuit.
- Then try to save your downloaded file on your desktop so that you get it easily.
- After that open your .exe file and move with the installation process.
- Double click to open the file and a license agreement page will pop up.
- Just tick on. I agree to continue.
- At last, tap on the finish.
Read Also- QuickBooks License Number: Get Product Key and Number
How to Use QuickBooks Clean Install Tool?
Go through the steps that will assist you to use QuickBooks Clean Install Tool:
Step 1: Remove QuickBooks Desktop Application

For using QBs clean tool, you first need to uninstall the QuickBooks desktop application. Here is what you should do:
- First, go to the Windows Start option then choose the Control Panel.
- After selecting the Control Panel, click on Programs and Features.
- Then from the list of programs, find the version of QuickBooks Desktop you want to uninstall.
- Lastly, tap on uninstall and then remove.
Step 2: Reinstall QuickBooks Software
Reinstalling QuickBooks Software is the last step in completing the QB clean install tool. To do so, follow the procedure:

- The first step is to insert your CD into the PC and follow the on-screen instructions.
- Then enter your license & product number.
- Now, select the installation type for the accounting.
- At last, reinstall your QuickBooks Software.
Read Also- Easy Guide to Fix the Error QBW32.exe or Fatal Application Exit
Step 3: Making use of the QB clean Install tool for PC

The installation directories must be renamed in this phase, which is simple to accomplish with the QB clean install tool. Below given is the procedure one can follow-:
- The first step is downloading QB Tools Hub from the official website of intuit’s.
- After that, double-click the downloaded file to start the installation process, then navigate towards the folder from where you can find all the downloaded and saved files.
- Follow the instructions displayed on the screen to get the application installed.
- After selecting “I Agree/Accept” to complete installation, launch QB Tool Hub on your desktop.
- Here, select the Installation Issues section and then tap on Clean Install Tool.
- Select the previously installed version of QuickBooks Desktop and click the Continue tab.
- The screen will eventually display the error code, “Please/get Install the copy of QB to default destination.” To finish this step, click OK after this.
The procedures listed below can be used if one is not able to access QB while the folders are being renamed:
- Navigate towards task manager window after launching Windows taskbar.
- Hit on Processes column and click on the header of Image name section.
- Click END after selecting QBDBMgern.exe, Exe, QBCFmonitorservice.exe.qbw32.exe, and QBCFmonitorservice.exe.
- When a warning message appears on the screen, you must click Yes to proceed.
Step 4: Change the folder names for the QB Desktop Installation manually

Windows 2020 cannot use the QB clean install tool. Therefore, in this situation, you may need to rename the directories using the procedures listed below manually:
- Open File Explorer by searching for it in the Start menu
- Locate the folder containing the company files and open it.
- (year) C:\ProgramData\Intuit\QuickBooks
- The current user’s C:\Users\(year) AppData\Local\Intuit\QuickBooks
- C:\Intuit\QuickBooks (year) Program Files
- C:\Program Files (x86)\Intuit\ 64-bit versionQuickBooks
- Look for the folder, then select it with a right-click. After that, select the Rename tab.
- After that, add “.old” to the very end of the folder’s name. This will prevent QuickBooks desktop from accessing this folder when it is reinstalled.
- Continue by reinstalling QuickBooks Desktop.
- The actions listed below can be helpful if you encounter the error notice “The access is restricted while renaming the folder” when the folder is being renamed:
- Press the control key + shift + Escape keys to access the task manager. Additionally, you can use the Start menu bar to search the task manager.
- Select the tab for Processes.
- To arrange the list, select the Name column heading.
- Next, search the processes tab for the QuickBooks-related processes Qbw32.exe, QBDBMgrN.exe, QBDBMgr.exe, and QBCFMonitorService.exe. Once you have selected each process, click on the End Process tab.
- Select the Yes tab if you get the warning that “terminating a procedure can cause unexpected results.”
Read More: Convert QuickBooks Online To Desktop With Simple Steps
Step 5: Compile all of the data and create a data backup
Gather all the information and documents before utilizing QuickBooks’ quick setup on your PC. Thus, the following are the steps:
- Initially, locate the product and license keys that were mailed to you if you placed an online order or on the packaging where they came from if you bought a hard copy.
- Next, get the most recent installation file required to install QuickBooks.
- Additionally, be careful to record the product’s version and year.
- Lastly, before continuing, backup your company’s data file from the earlier version of QuickBooks.
Step 6: Get the QB tool hub and install it

Installing the QB tool hub is a prerequisite for using the Clean Install tool. The following are the steps:
- First, turn off QuickBooks if it’s open.
- On your PC, install the latest update for the QuickBooks Tool Hub.
- Save the file for your tool.
- The downloaded file can then be opened by double-clicking it.
- After that, you’ll see instructions on the screen that you must follow.
- As stated during installation, agree to the terms and services
- After the installation, press shift + F10 on the icon to bring up a menu from which you can choose.
- Launch it now in administrator mode.
- Lastly, this will launch the tool hub application.
Step 7: Verify a clean installation
QuickBooks employs the clean install approach if you are unsuccessful in fixing the issue with the standard reinstallation tool. You can complete the process and fix your problems by applying a clean install tool setup.
Read More: QuickBooks License Error | Solutions To Fix QB Error 3371
Conclusion
We hope that our article has covered all topics that you have been searching for and you can use the Clean install tool easily and effectively. For any further queries, you can call us anytime. We will be there to assist you anytime 24×7.
Frequently Asked Questions
Answer- Follow these simple steps to reinstall QuickBooks for Windows:
- Firstly, insert your CD into the PC and follow the on-screen instructions.
- Then enter your license & product number.
- Now, select the installation type for the accounting.
- At last, reinstall your QuickBooks Software.
Answer- No, you won’t lose the data by uninstalling and reinstalling QuickBooks. It will only remove your QuickBooks application.
Yes if you upgrade your QuickBooks version then you should clean up your system as there is a chance of installation errors.
