

Despite the rise of digital payments, printing checks remains an integral part of many businesses. Now you can automate this process if you use QuickBooks as your primary accounting software. Understanding how to print checks in QuickBooks Online can save you labour costs, time and effort. With built-in tools for creating and managing payments, QuickBooks Online’s print checks feature allows businesses to generate professional-looking checks directly from the system.
Instead of relying on manual entries, you can streamline your payment workflow, reduce errors, and maintain accurate financial records. Whether it is paying vendors, controlling expenses, or payroll, QuickBooks checks make sure that all the transactions are properly noted and easily followed.
This guide will help you understand the complete process, from setup to printing, so you can efficiently handle check payments.
What Is Check Printing in QuickBooks Online?
Check printing in QuickBooks Online is an inbuilt functionality that enables businesses to write checks manually or using the software and then print them. With QuickBooks online print checks, one can input payment information, including payee name, amount, and bank account, and print checks on compatible check stock such as voucher, standard, or wallet. It not only enhances accuracy but also makes sure that all transactions are automatically tabulated in your accounting system.
When using QuickBooks checks, you may print immediately or choose “Print Later” so you can process a number of payments using a print queue. The platform also includes alignment and print setup tools to make sure that the checks are formatted properly. Overall, this feature makes the payment processing much easier, improves record-keeping, and offers a more convenient means of dealing with business transactions.
Writing and Printing Checks in QuickBooks Online
The QuickBooks Online print checks feature allows you to easily write and print checks in a streamlined workflow. You do not need to write down or make payments manually, just create a check, save it in a queue and then print it when necessary. This provides accuracy, saves time and makes your financial records automatically updated.
Digitally writing checks is a valuable aspect of proper financial record-keeping and the smooth running of business activities. QuickBooks Online print checks can help businesses to document all payments correctly, minimise manual errors, and track expenses in real time. Creating QuickBooks checks also contributes towards a well-organised audit trail that is crucial to reconciliation and financial reporting.
Direct printing of your accounting software allows you to be accurate, save time and project a professional impression. QuickBooks Online Print Checks will enable businesses to automate their payment system, prevent human error, and make sure that all transactions are accurately recorded. QuickBooks checks are also essential to maintain a good payment trail, which may be needed during audits and financial tracking. Once the printing is successful, QuickBooks will automatically delete the check from the print queue and keep your records updated and organised.
Why You Need to Print Checks in QuickBooks Online?
Using QuickBooks Online to print checks is not just for convenience; it’s a smart way to manage business payments with accuracy and efficiency. Digital payment is popular, but QuickBooks checks are still a secure choice among numerous businesses, particularly in the case of vendor payment, payroll, and keeping records.
Significance of Printing Checks in QuickBooks Online
- Proper record keeping: All the printed checks get automatically saved in your accounting records.
- Professional Output: Printed checks maintain a clean and business-ready record of transactions in comparison with handwritten checks.
- Time-Saving Process: Lessens manual tasks and accelerates payment processing.
- Reducing errors: Reduces errors in calculating and entering data.
- Easy Tracking & Audit Trail: Helps in reconciliation and financial reporting.
- Safe Payments: Physical checks give written evidence of transactions.
In general, printing checks in QuickBooks enhances control, organisation and efficiency in your financial workflow.
Requirements Before Printing Checks in QuickBooks Online
Before you start using QuickBooks Online print checks, it’s important to ensure that all requirements are properly set up. The correct configuration can prevent printing errors, misalignment and unproductive check stock.
- Printer Setup: Make sure your printer is correctly installed, connected, and configured. Check that the printer scale is set to 100% and that the printer supports standard paper sizes like- 8.5” x 11”. Updated drivers help prevent printing errors.
- Check Stock (Voucher, Standard, Wallet): Use compatible check stock designed for QuickBooks. Choose between voucher checks (with stubs), standard checks (three per page), or wallet checks based on your business needs.
- Bank Account Setup in QuickBooks: Ensure your bank account is properly added and active in QuickBooks. This allows the system to pull accurate payment details and record transactions automatically.
- Alignment Set-up Significance: Proper alignment makes sure that the text appears at the right places on the check. Always print a test on plain paper and make changes as necessary to prevent misprints.
How to Create Checks in QuickBooks Online?
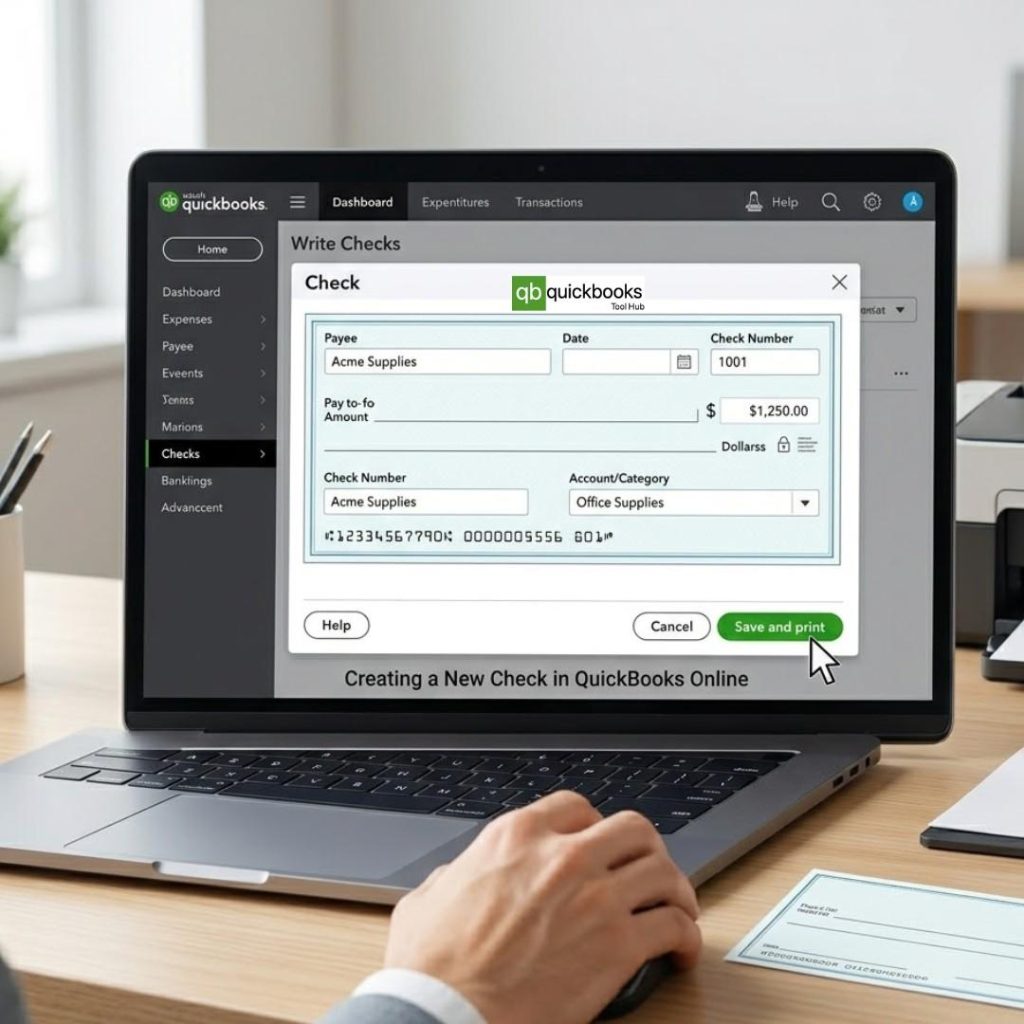
Creating checks in QuickBooks is a simple process that helps you manage business payments efficiently. QuickBooks Online allows you to print checks and add payment information, assign expenses, and maintain your financial records precisely and current. Well-prepared QuickBooks checks provide a clear track and simple reconciliation.
Steps to Create Checks in QuickBooks Online
- Click on + New from the dashboard.
- Choose Check under the Vendors tab.
- Select the Payee or add a new vendor, if necessary.
- Choose the Bank Account from which payment will be processed.
- Enter Date and Amount as Payment Details.
- Provide required information, such as the Category, Account, or Description.
- (Optional) Set Print Later to add the check to the print queue.
- Check all details meticulously.
- Click Save and Close or Save and New
Once saved, the check is recorded in your QuickBooks account and is ready for printing or future reference.
How to Print Checks in QuickBooks Online?
QuickBooks printing checks is an essential measure in finalising your payment. With QuickBooks Online print checks, you can quickly print single or multiple checks while ensuring all transaction details are accurately recorded. QuickBooks checks can be used to send payments in a time-saving manner, offering an organised approach to payments.
Steps to Print Checks in QuickBooks Online
- Click on + New from the dashboard.
- Select Print Checks.
- Choose the appropriate Bank Account.
- Load your check stock (voucher or standard) into the printer.
- If you are using it for the first time, click Print Setup to align your checks.
- Select the checks you want to print from the list.
- Enter the starting check number.
- Click Preview and Print.
Preview and Printer Checks
Before finalising the print, QuickBooks allows you to preview your checks to ensure everything is accurate. This step is important to avoid errors and wasted check stock.
- Review the layout, payee details, and amount carefully.
- Ensure the alignment matches your check stock.
- Confirm that the check number is correct.
- Click Print once everything looks accurate.
After printing, confirm that the checks printed correctly. QuickBooks will then remove them from the print queue, keeping your records clean and up-to-date.
How to Set Up Printer Alignment in QuickBooks Online?
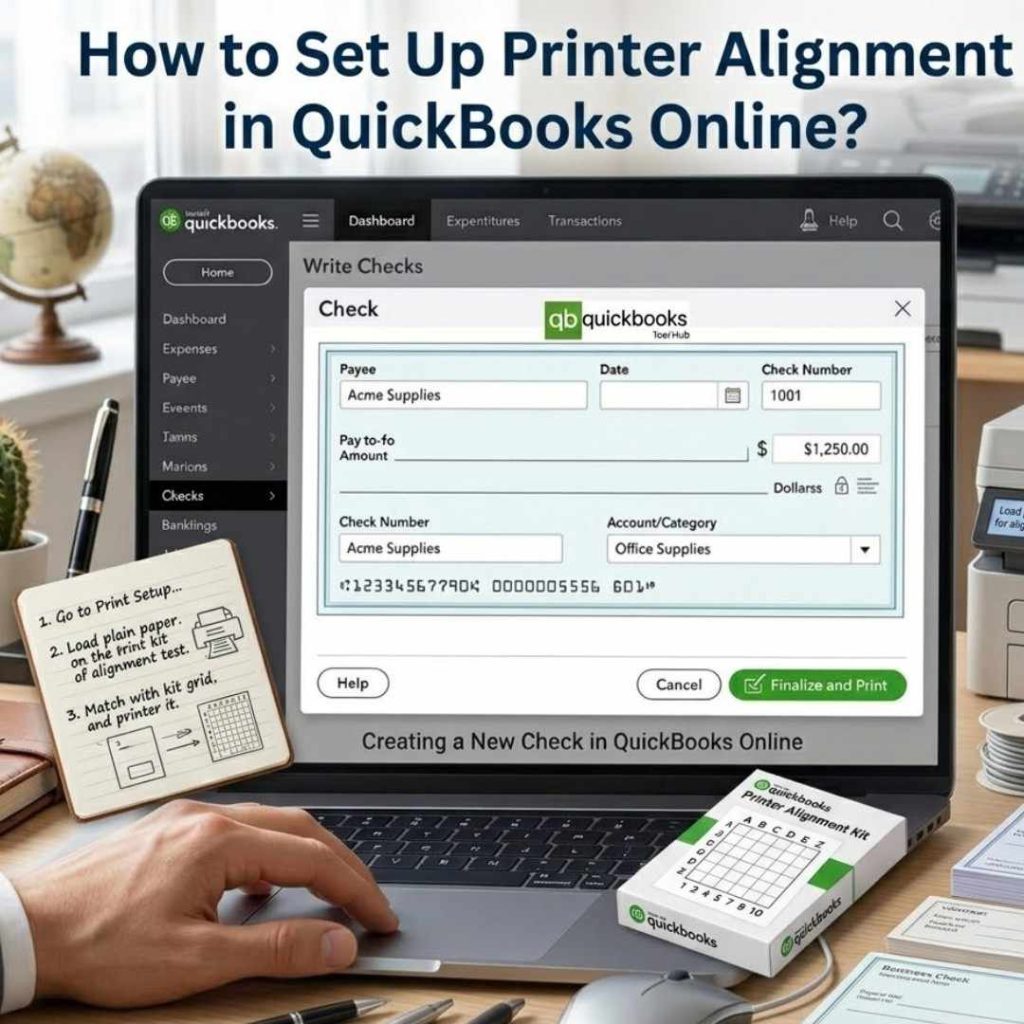
Setting up proper alignment is a critical step when using QuickBooks Online printer checks. Any minor misalignment may print crucial information like the name of the payee, the amount, or the check number in the wrong place. When you set up your alignment settings properly, you make sure that your QuickBooks checks appear professional and perfectly correspond to your check stock.
Why Alignment Matters?
Alignment makes sure that the information printed accurately fits the areas assigned on the check. Poor alignment may cause low readability of checks, payment rejection or loss of check stock. An accurate setup can prevent inaccurate results and reprints.
Adjusting Vertical and Horizontal Settings
QuickBooks provides alignment tools that let you fine-tune the placement of printed content. You can adjust:
- Vertical settings to move text up or down.
- Horizontal settings to shift text left or right.
These adjustments help match the printed content with the check layout.
Printing Sample Alignment
Before printing actual checks, always print a sample on plain paper:
- Go to + New → Print Checks → Print Setup.
- Select your check type (voucher or standard).
- Printing a sample check.
- Place it over a real check to compare alignment.
- Adjust settings if needed and repeat until perfect.
Once everything aligns correctly, you can confidently print your checks without errors.
Best Practices for Accurate Check Printing in QuickBooks Online
Printing checks correctly is essential to avoid errors and wasted check stock, and payment delays. By following a few practices, you can ensure your QuickBooks Checks are accurate and ready to use.
- Use Test Prints First: Always print a sample on plain paper before actual check stock. This helps to verify alignment and prevents costly mistakes.
- Use the Correct Check Stock: Ensure you are using compatible formats like voucher, standard, or wallet checks. Using the wrong type can lead to formatting issues.
- Keep Printer Settings Consistent: Maintain settings such as 100% scale, correct paper size (8.5” x 11”), and proper orientation. Avoid changing settings frequently.
- Use Reliable PDF Viewer (Adobe Reader): For better print accuracy, use Adobe Reader, as it handles check formatting more precisely than a browser.
- Avoid Common Alignment Mistakes: Do not skip the alignment setup. Even slight misalignment can shift important details like the amount or the payee name.
- Check Printer Ink and Quality: Low ink or poor print quality can amke checks unreadable or unprofessional.
- Verify Details Before Printing: Double-check the payee name, amount, and check number in the preview screen.
- Print in Batches Carefully: When printing multiple checks, ensure the correct starting check number and proper sequence.
Following these tips will help to ensure seamless, error-free check printing and save both time and resources.
Types of Checks You Can Print in QuickBooks Online
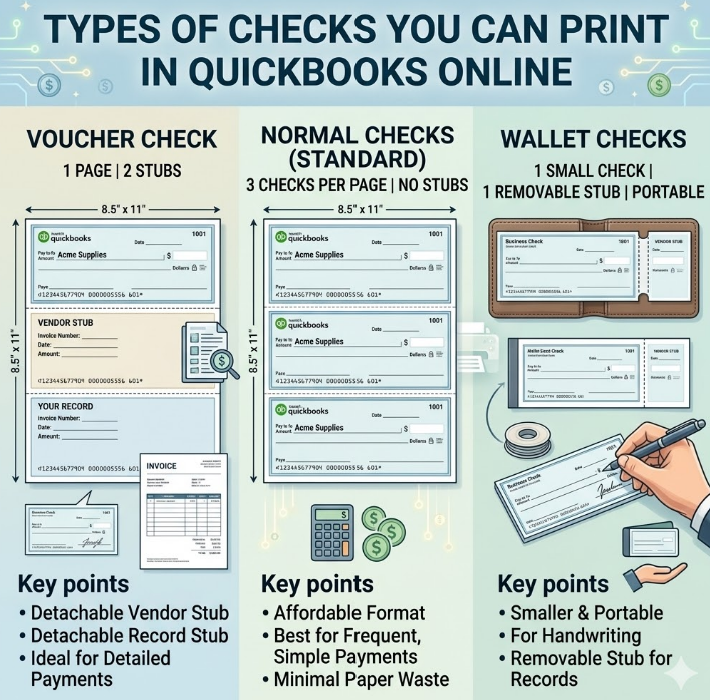
QuickBooks Online supports multiple check formats to suit different business needs and payment workflows. Before you start printing, it is important to understand what type of check would be best for you, because selecting a form of check that does not address the problem will result in alignment problems and loss of check stock. Here are three types of checks you can print in QuickBooks:
Voucher Check
A voucher check is printed on one page and has two stubs, one to keep on your records and another for the recipient. They consist of pages 812 “ x 11” and are perfect to provide detailed payment details to the vendors. The stub part contains payment information like invoice number, date, and amount, which makes record-keeping more convenient.
Normal Checks
Standard checks are those that are printed on 3 checks per page, thus it is an affordable check for businesses that make frequent payments. They do not have stubs, hence they are suitable for simple payment to the vendors where detailed payment data is not needed.
Wallet Checks
Smaller and portable types of checks with a stub that can be removed to maintain records. They are well adapted to those businesses which requires handwriting checks often instead of printing in large batches using QuickBooks.
QuickBooks Check Printing: Buying Checks
To print checks directly from QuickBooks Online, you need a compatible pre-printed check stock, and the checks must be properly formatted. You can’t use regular blank paper as a substitute for actual check stock; checks need to be formatted with your bank’s MICR line at the bottom. Here is what you need to consider before buying checks and setting up for printing:
Buying Compatible Checks
When purchasing check stock for QuickBooks, you have two main options:
Purchase Directly from Intuit
The safest and most reliable option is to order checks directly through the QuickBooks or Intuit website. These checks are guaranteed to be compatible with QuickBooks print layout, meaning you will spend minimal time on alignment adjustments. Intuit offers all three check formats- voucher, standard, and wallet.
Third-Party Vendors
You can also purchase QuickBooks-compatible checks from third-party check printing vendors. However, you must confirm explicitly that the checks are formatted for QuickBooks before ordering. Even minor differences in layout can cause persistent alignment problems that are difficult to resolve.
QuickBooks Check Options and Pricing Overview
| ChecK Type | Key Features | Ideal Use Case | Approx. Price (50 Pack) |
| Basic Voucher Checks | Includes two stubs for record-keeping and sharing. | Accounts payable and payroll. | $36.99 |
| Secure Plus Voucher Checks | Heat-sensitive ink, watermark protection, and anti-tampering coating. | Businesses need enhanced security. | $66.99 |
| Secure Premier Viucher Checks | Advanced security with hologram and anti-counterfeit features. | High-security business transactions. | $72.99 |
Difference Between Printing Checks & Writing Manual Checks in QuickBooks
QuickBooks offers two options to check payments: you can print checks directly in the software or you can manually write checks and add them later. Both approaches have their niche based on the business size, volume of payments, and workflow preferences. The distinction between these two will assist you in choosing a more reasonable one for your business:
Printed Checks in QuickBooks
Printed checks are created entirely within QuickBooks Online and sent directly to your printer on compatible check stock. The entire process, from entering payment details to generating the physical check, happens inside the software without any manual writing involved.
Manual Checks in QuickBooks
Manual checks are physical checks written by hand outside of QuickBooks. After writing the check, you record it inside QuickBooks to keep your accounts and register up-to-date. The check itself is created entirely outside the software. QuickBooks only receives the Transaction record after the fact.
Comparison Between Printed Checks & Manual Checks At a Glance
| Feature | Printed Checks | Manual Checks |
| Speed for Single Payment | Slower, requires setup. | Faster, write, and go. |
| Speed for Multiple Payments | Much faster, batch printing. | Slower, each written individually. |
| Accuracy | High, software auto-fills details. | Lower human error risk. |
| Professional Appearance | Yes, consistent and clean. | No, varies by handwriting. |
| Auto-Recorded in QuickBooks | Yes, instantly. | No, requires manual entry. |
| Cost | Higher, check stock required. | Lower standard chequebook. |
| Reconciliation Ease | Easy, all data is already in QB. | Harder, manual cross-referencing. |
| Fraud Protection | High, secure check stock features. | Lower, standard checks only. |
| Accessibility | Requires a printer and setup. | Available anywhere, anytime. |
Common Problems While Printing Checks in QuickBooks Online
Even after setting everything up correctly, check printing on QuickBooks doesn’t always go smoothly. Certain problems tend to come up repeatedly and can bring your payment process to a sudden halt if you do not know how to handle them. Here are the most common issues users run into while printing checks in QuickBooks Online, and exactly what to fix them:
Alignment Issues
The printed content on your checks doesn’t line up with the fields on your check stock. The payee name, amount, date, or signature lines print too high, too low, too far left, or too far right, making the check unusable and potentially invalid. Here are some of the major causes of this issue, along with fixes:
Print Scale is Set to Anything Other than 100%:
Open your print dialogue box when printing from QuickBooks → locate the scale or page sizing option → set it exactly 100% → never allow fit-to-page or any other scaling option → confirm the settings and attempt the print again.
Wrong Check Type
Click +New and select Print Checks → click Print Setup at the bottom of the page → confirm that the check type matches the physical check stock you currently have.
Alignment Grid is not Properly Configured:
Inside Print Setup, select No, Continue Setup → the alignment window will open, displaying a check image with a draggable grid → adjust the girds until the number field matches matches the position of your print sample → click View Preview and Print Samle to test the new alignment → repeat the adjustment process until the sample lines up perfectly with your check stock → Click Finish Setup once the alignment is correct.
Adobe Acrobat Reader Not Set as Default PDF Viewer
Open your browser settings and locate the PDF viewer option → switch the default from the browser’s built-in viewer to Adobe Acrobat Reader → relaunch QuickBooks and attempt the print again, browser PDF viewers frequently cause scaling issues that result in misalignment.
Printer Not Responding
Sometimes when you try to print, and the printer does not respond, it shows offline, or the print job disappears from the queue without producing any output. The major reason behind this issue is a communication breakdown between your computer and the printer. Here are some root causes and their fixes:
Printer Not Properly Connected or Offline
Verify that the printer is powered on and all cables are securely connected → if using a network printer, confirm it is connected to the same network as your computer → check the printer’s display panel for any error messages or paper jam indicators that need to be cleared first.
Stuck Print Jobs in Printer Queue
Open Control Panel on your computer → go to Devices & Printers → right-click your printer and select See what’s printing → cancel all pending print jobs stuck in the queue → restart the printer and attempt the print from QuickBooks again.
Incorrect Default Printer Selected
Go to Control Panel → Devices & Printers → right-click the printer you want to use for checks → select Set as Default Printer → return to QuickBooks and try printing again to confirm the correct printer is now being used.
Outdated or Corrupted Printer Driver
Visit your printer manufacturer’s official website → search for the latest driver version compatible with your Windows version → download and install the updated driver → restart your computer after installation and reload QuickBooks before attempting to print again.
Print Spooler Service Not Responding
Press Windows + R on your keyboard and type services.msc → locate Print Spooler in the services list → right-click it and select Restart → once the services restart, go back to QuickBooks and attempt the print again.
Checks Not Showing in the Print Queue
You created checks inside QuickBooks, but when you go to + New → Print Checks, the checks you created do not appear in the print queue, and the list is either empty or only shows older checks. This happens when the Print Later checkbox is not selected or when the check was created. Below are some causes and fixes of this issue:
Locate and Edit the Original Check
Go to your QuickBooks Online dashboard → click the Search icon or navigate to Accounting → Chart of Accounts → find the bank account the check was created under and locate the specific check → open the check and look for the Print Later checkbox → check the Print Later box if it was not selected originally → click Save and Close → the check will now appear in the print queue.
Verify You Are Viewing the Correct Bank Account in the Print Queue
Click + New and select Print Checks → Look at the bank accounting dropdown at the top of the print queue screen → make sure the account displayed matches the bank account the check was written from → switch to the correct account if needed, your checks should appear in the queue immediately.
Check the Date Range
Confirm that the checks you created fall within the date range currently being displayed in the print queue → adjust the dte filter if necessary to include the dates of the checks you are looking for.
Wrong Bank Account Selected
Sometimes, after printing, users realise that the check was drawn from the wrong bank account inside QuickBooks, which makes reconciliation difficult. QuickBooks Online defaults to the last bank account used when creating a new check. If your business operates multiple bank accounts, then this is a common issue you may face. Some common reasons and their fixes are given below:
Incorrectly Recorded Check
Locate the Check option in your QuickBooks register under the wrong bank account → open the check transfer → click More at the bottom of the transaction screen → select Void to cancel the transaction without deleting the record → this keeps your audit trail intact.
Incorrect Bank Account Details
Click +New and select the Check → from bank Account dropdown at the top of the check screen → carefully select the correct bank account before entering any other details → fill in the payment details (payee, amount, date, and category) → select Print Later to add it to the print queue.
No Default Account Verification Leading to Errors
Since QuickBooks defaults to the last used account automatically, make it a habit to always verify the bank account field before saving any check → if your business regularly uses one primary account for check payments, ensure that account is always selected first whenever you begin creating a new check to reduce the risk of this error recurring.
Conclusion
Printing checks directly from QuickBooks Online is one of those features that genuinely makes a difference once you have it set up correctly. It saves time, keeps your records accurate, and gives your payments a professional finish that manual checks simply can’t match. Whether you are printing voucher checks for payroll, standard checks for vendor payments, or handling a one-off payment by hand, knowing which method suits the situation is what keeps your payment workflow running without unnecessary disruptions.
The key is getting the setup right from the beginning, checking compatible stock, correct alignment, consistent printer settings and selecting the right PDF viewer. Once these things are in place, check printing in QuickBooks becomes a quick and reliable part of your routine.
If alignment issues, printer problems, or print queue errors do come up, the troubleshooting steps covered in this guide will help you resolve them quickly and get back on track.