
QuickBooks Error 15222 is a payroll update error that occurs when your software fails to verify the digital signature of the update files. This interrupts your payroll update process by blocking your ability to download current tax tables. The system will reflect error messages like “The payroll update did not complete successfully” or “QuickBooks was unable to verify the digital signature.” It can also impact your payroll calculations. From our experience with solving this issue, we have identified that incorrect date and time, disabled File Copy Service, firewall interference, misconfigured internet, or corrupted payroll components can block QuickBooks from authenticating update files, causing Error 15222.
What is QuickBooks Error 15222?
QuickBooks error 15222 appears when QBs can’t make a connection with the internet to download the updated files. This shows that your QuickBooks failed to verify the digital signature. Several other reasons can be seen, such as the wrong setup of internet settings or using an old version of QuickBooks.
| Error Name | Error 15222 |
| Error Description | QuickBooks could not verify the digital signature for the update file |
| Cause | Internet Explorer is not functioning |
| Symptoms | Unable to download QuickBooks updates |
| Solution | Install a digital signature |
| Applies to | Windows Vista, XP, 7, 8 |
Why Does QuickBooks Update Error 15222 Occur?
Understanding what triggers Error 15222 helps users to fix the problem faster and prevents it from happening again. Here are the most common causes we have identified from real queries:
- Incorrect Date and Time Settings: When your system’s date and time don’t match the actual time zone, QuickBooks can’t authenticate the digital signature on update files.
- Disabled QuickBooks File Copy Service (FCS): When the FCS service is turned off, QuickBooks fails to copy updated payroll files to the correct location, blocking the entire update process.
- Firewall or Security Interference: Your Windows Firewall or third-party antivirus programs sometimes block QuickBooks from connecting to Intuit servers, preventing the update file download and digital signature verification.
- Corrupted Payroll Components: An incomplete payroll installation or a damaged file prevents QuickBooks from processing updates correctly, causing Error 15222.
- Misconfigured Internet Connection Settings: Wrong internet settings in QuickBooks or Internet Explorer prevent the software from establishing secure connections to Intuit’s update servers.
- Digital Signature Verification Failure: Sometimes, due to a corrupted, expired, or missing digital certificate, QuickBooks can’t verify the authenticity of the update files, causing Error 15222.
- Outdated Windows Operating System: Running an outdated Windows version creates compatibility conflicts between system components and QuickBooks, causing authentication failures.
- Incorrect Default Browser Settings: QuickBooks relies on Internet Explorer to complete its activities. When these are not configured correctly, the update connection fails, causing an error.
What are the Symptoms of QuickBooks Error 15222?
If your system is showing these indications, then it’s good as you have recognised the QuickBooks error 15222. Have a look:
- The performance of your system slows down.
- QuickBooks error 15222 displays on your screen.
- Interruption in the downloading process of Payroll Updates.
- Active Windows gets frozen.
- QuickBooks update is not completed.
Also Read: QuickBooks File Doctor: Download And Installation GuideHow to Fix QuickBooks Error 15222?
Now that you have acknowledged all the factors, it’s time to move further to kick out these factors to resolve the issue.
Solution 1: Update the QuickBooks Core Data F iles
QuickBooks core data files play an essential role in establishing communication with the Intuit server during payroll updates. When this file gets corrupted, QuickBooks fails to verify digital signatures.
- QB32.exe
- QBUptdate.exe process
- Quickbooks.com
- Intuit.com
- Payroll.com Domains
Solution 2: Digital Signature Certificate Installation
The digital signature certificate helps QuickBooks to verify that the update files that are coming from Intuit’s servers are authentic. When it is missing, QuickBooks immediately blocks the update.
- To initiate, close the QB application.
- As you may not be able to locate the digital signature while opening QuickBooks.
- Then, just move towards C:\Program Files\Intuit\QuickBooks\properties.
- Choose QBW32.exe in the Properties section.
- Consequently, perform a right-click on the QBW32.exe file.
- Hit the Digital Signature button.
- Also, choose Intuit Inc from the signature list.
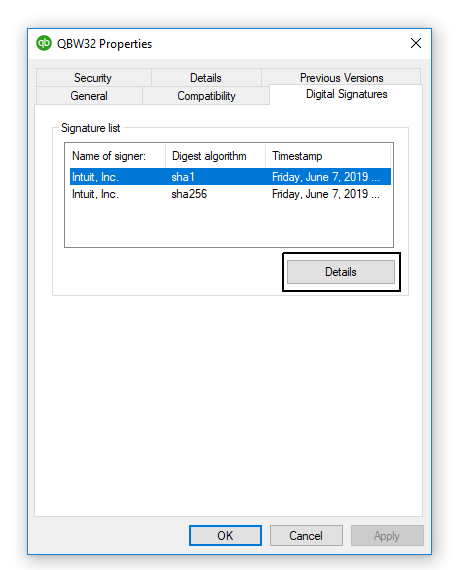
- Click on the Details button.
- Thereafter, pick View Certificate.
- Tap Install Certificate.
- Hit Next when you see the Finish icon on the screen.
- After that, choose Finish.
- Make sure to reboot the system once you have done these steps.
- Open QuickBooks Desktop for downloading updates.
- Finally, just download the update.
Also read: QuickBooks Connection Diagnostic ToolSolution 3: Verify the Internet Connection
A misconfigured and unstable internet connection prevents QuickBooks from establishing a secure connection with the payroll update files. Checking the internet configuration early helps in the troubleshooting process.
- The first action to take in this solution is to set Internet Explorer as the Default Browser on the system
- After that, the next step is to verify that the Date and Time on the system are correct; if not, then make them correct.
- Now, check the Cypher strength; the cypher strength has to be higher than 128-bit encryption.
- Once the above steps are completed, the user has to update the settings by selecting the Tools and Internet option.
Solution 4: System File Checker + OS update troubleshooting
Corrupted Windows system files and the operating system create compatibility conflicts that directly trigger Error 15222. System File Checker tools and Windows update combinely repairs these damaged files and prevent future issues.
Run System File Checker
- Go to the Start menu.
- Type “Command Prompt” from the results.
- Select Run as Administrator.
- Click Yes.
- A black command window will open.
- Run the DISM tool by typing this command:
- DISM.exe/Online/Cleanup-image/Restorehealth
- Press Enter.
- Wait for the process to complete.
- Now type the System File Checker command: sfc/scannow.
- Then, press Enter and wait for the scanning process.
- Now you will be able to see one of these messages:
- “Windows Resource Protection did not find any integrity violations” (no problems found) or “Windows Resource Protection found corrupt files and successfully repaired them.
- Type “exit” and then press Enter to close Command Prompt.
- Restart your computer.
Update Windows Operating System
- Press Windows +1 to open Settings.
- Click Update and Security.
- Select Windows Update from the left panel.
- Then, click Check for Updates.
- Windows will search for available updates.
- If updates are found, click Download and install.
- Some updates require a system restart.
- Click Restart Now when prompted.
- After restarting, go back to Windows Update.
- Click on Check for Updates again to ensure no updates were missed.
Solution 5: Turn on QuickBooks File Copy Service (FCS)
The File Copy Service is an essential background service that QuickBooks uses to copy and install updated payroll files to the correct system locations. Without FCS running, QuickBooks physically can not move the download update files where they need to go.
- Press Windows +R to open the Run dialogue box.
- Type “COMPMT.MSC” and press Enter.
- The Computer Management window opens.
- In the left panel, expand Services and Applications.
- Then, click on Services.
- Scroll through the list to find “Intuit QuickBooks FCS”.
- Double-click on Intuit QuickBooks FCS.
- The Properties window will open.
- Then, click on the General tab.
- Find the Startup Type from the dropdown menu.
- Change it from Disabled to Manual.
- Next, click on Apply.
- Click Start to activate the service.
- Click OK and close the Properties window.
Solution 6: Create Inbound Rules for QuickBooks
Inbound rules control what incoming traffic your firewall permits. Configuring Inbound rules allows QuickBooks to access required ports and executable files.
- Click on Inbound Rules from the left panel.
- Next, click on New Rule from the right panel.
- Select Program and then click Next.
- Then, click on This Program Path.
- Click Browse.
- Go to your QuickBooks installation folder.
- Add each of the QuickBooks files at a time:
- C:\Program Files\Intuit\QuickBooks [Year]\QBW32.exe.
- C:\Program Files\Intuit\QuickBooks [Year]\QBDBMgrN.exe.
- C:\Program Files\Common Files\Intuit\QuickBooks\QBUpdate.exe.
- C:\Program Files\Common Files\Intuit\QuickBooks\QBCFMonitorService.exe
- Click Next.
- Select Allow the Connection→Next.
- Check all three profiles: Domain, Private, and Public→Next.
- Name the rule clearly (e.g.,” QuickBooks Inbound QBW32”).
- Click Finish.
- Repeat these steps for each executable file listed above.
Add Port Exceptions:
- In Inbound Rules, click New Rule.
- Select the port and then click Next.
- Select TPC.
- Enter the port numbers as per your QuickBooks version:
- QuickBooks 2024: 8019,56728-56730
- QuickBooks 2023: 8019, 56723-56725
- QuickBooks 2022: 8019, 56720-56722
- Then click Next and select Allow the Connection.
- Click Next again, then check all profiles: Domain, Private, and Public.
- Name the rule and click Finish.
Solution 7: Reconfigure Firewall and Malware Software
When your firewall blocks QuickBooks from accessing Intuit’s servers, preventing update downloads and digital signature verification. You need to create specific inbound and outbound rules to allow QuickBooks to communicate freely while keeping your system protected.
Windows Firewall Settings
- Press Windows +R to open the Run dialogue box.
- Type “control” and then press Enter.
- The Control Panel will open.
- Navigate to System and Security.
- Click Windows Defender Firewall.
- From the left panel, select Advanced Settings.
- The Windows Firewall with Advanced Security window opens.
Configure Third-Party Security Software
- Open your antivirus or security software.
- Go to Settings or Protection Controls.
- Find the Exceptions, Exclusions, or Whitelist section.
- Click on Add Exception.
- Browse to C:\Program Files\Intuit\QuickBooks [Your Version]
- Add the entire QuickBooks folder to exceptions.
- Also add C:\Program Files\Common Files\Intuit
- Save all changes.
- Restart your security software.
Solution 8: Restart QuickBooks Services
In order to handle the database management and network communication, QuickBooks runs several background services. When these services get stuck or stop unexpectedly, they cause Error 15222 during payroll updates.
- Press Windows +R to open the Run dialogue box.
- Type “service.msc” and press Enter.
- The Services window opens, showing all system services.
- Scroll through the list and locate these QuickBooks services:
- QuickBooksDBXX (XX represents your version year, e.g., QuickBooksDB24 for 2024).
- QBCFMonitorService.
- Intuit QuickBooks FCS.
- For each service, right-click on it.
- Select Stop from the context menu.
- Wait for the service to stop completely.
- Right-click the same service again.
- Then, select Start.
- Verify the Status column shows “Running” for each service.
- If a service won’t start, right-click on it.
- Select Properties.
- Change Startup Type to Automatic.
- Click Apply and then Start→OK.
- Repeat this process for all QuickBooks services.
Solution 9: Test QuickBooks Connection
Testing the QuickBooks connection confirms whether the fixes that you have implemented have worked before you attempt to download the payroll updates again.
- Open QuickBooks and log in as an Administrator.
- Navigate to the Help menu.
- Select Internet Connection setup.
- Next, choose “Use my computer’s internet connection settings”.
- Click Next→Done.
- Navigate to the Help menu again.
- Select Update QuickBooks Desktop.
- Click Update Now.
- Check the Reset Updates checkbox→Get Updates.
- If the download starts successfully, your connection is working.
Switch Between User Modes
- Navigate to the File menu in QuickBooks.
- Then, click on Switch to Multi-User Mode.
- If it switches successfully, then change it to Single-User mode.
- When you can switch between these two options seamlessly, it confirms that your firewall is not blocking QuickBooks.
Verify Payroll Connection
- Navigate to the Employees menu.
- Select Get Payroll Updates.
- Click on Download Entire Update and then again click on Update.
- If the download completes without Error 15222, your connection is completely restored.
Solution 10: Set Internet Explorer as the Default Browser
QuickBooks depends on Internet Explorer components to process payroll updates and verify digital signatures. When IE is not properly configured, QuickBooks fails to establish a connection with secure servers.
- Open Internet Explorer.
- Press the Alt key on your keyboard to open the menu bar.
- Click on Tools.
- Select Internet Options.
- Next, navigate to Advanced Settings.
- Scroll down to the Security section.
- Check the SSL 2.0 and SSL 3.0 boxes.
- Make sure TLS 1.2 is checked.
- Uncheck TLS 1.0 and TLS 1.1
- Click OK and Apply.
- Close Internet Explorer.
Read More: Fix QuickBooks Error H505 | Multi-User Mode IssueHow to Prevent QuickBooks Error 15222?
Preventing Error 15222 stops critical payroll updates, making it essential to verify your system’s security certificates and connectivity. You can prevent this error by following the measures which are given below:
- Ensure your system’s current date and time are accurate and enable automatic synchronisation with the internet time servers to avoid certificate validation failures.
- Ensure Internet Explorer is the default browser in your system.
- Enable and maintain the QuickBooks File Copy Service (FCS) by setting its startup to “Manual” so it’s always available when payroll updates run.
- Configure your Windows Firewall and include QuickBooks on the exception list of the executable files.
- Always run QuickBooks as an administrator when downloading payroll updates to ensure that the software has permission for system access.
- Before every update, create a complete company file backup to protect your financial data against unexpected errors.
When Should You Seek Professional Help for QuickBooks Error 15222?
Knowing exactly when to contact experts can save your business from data compliance and extended payroll disruptions. Contact experts when:
- The error occurred after a Windows update or security software installation, indicating system-level conflicts requiring specialised diagnosis.
- You have attempted the System File Checker scan and DISM commands, but Windows system files continue showing corruption.
- Multiple workstations in your office are simultaneously experiencing Error 15222.
- You are confused about Windows Services, firewall inbound and outbound rules, or registry modifications that carry the risk of system damage.
- Your payroll processing time is approaching, and trial-and-error troubleshooting is not an option you can afford right now.
Conclusion
These above-mentioned solutions will definitely help you to fix QuickBooks error 15222 and you can continue using QuickBooks software. Also, don’t hesitate in asking any questions related to this error. Because we are 24*7 available for your support and we feel happy if we get the chance to serve you again.